> ## Documentation Index
> Fetch the complete documentation index at: https://docs.open-metadata.org/llms.txt
> Use this file to discover all available pages before exploring further.
# Docker Deployment | OpenMetadata Container Setup
> Deploy the platform using Docker containers to simplify setup, scaling, and local testing without needing external dependencies.
# Docker Deployment
This guide will help you set up the OpenMetadata Application using Docker Deployment.
Before starting with the deployment make sure you follow all the below Prerequisites.
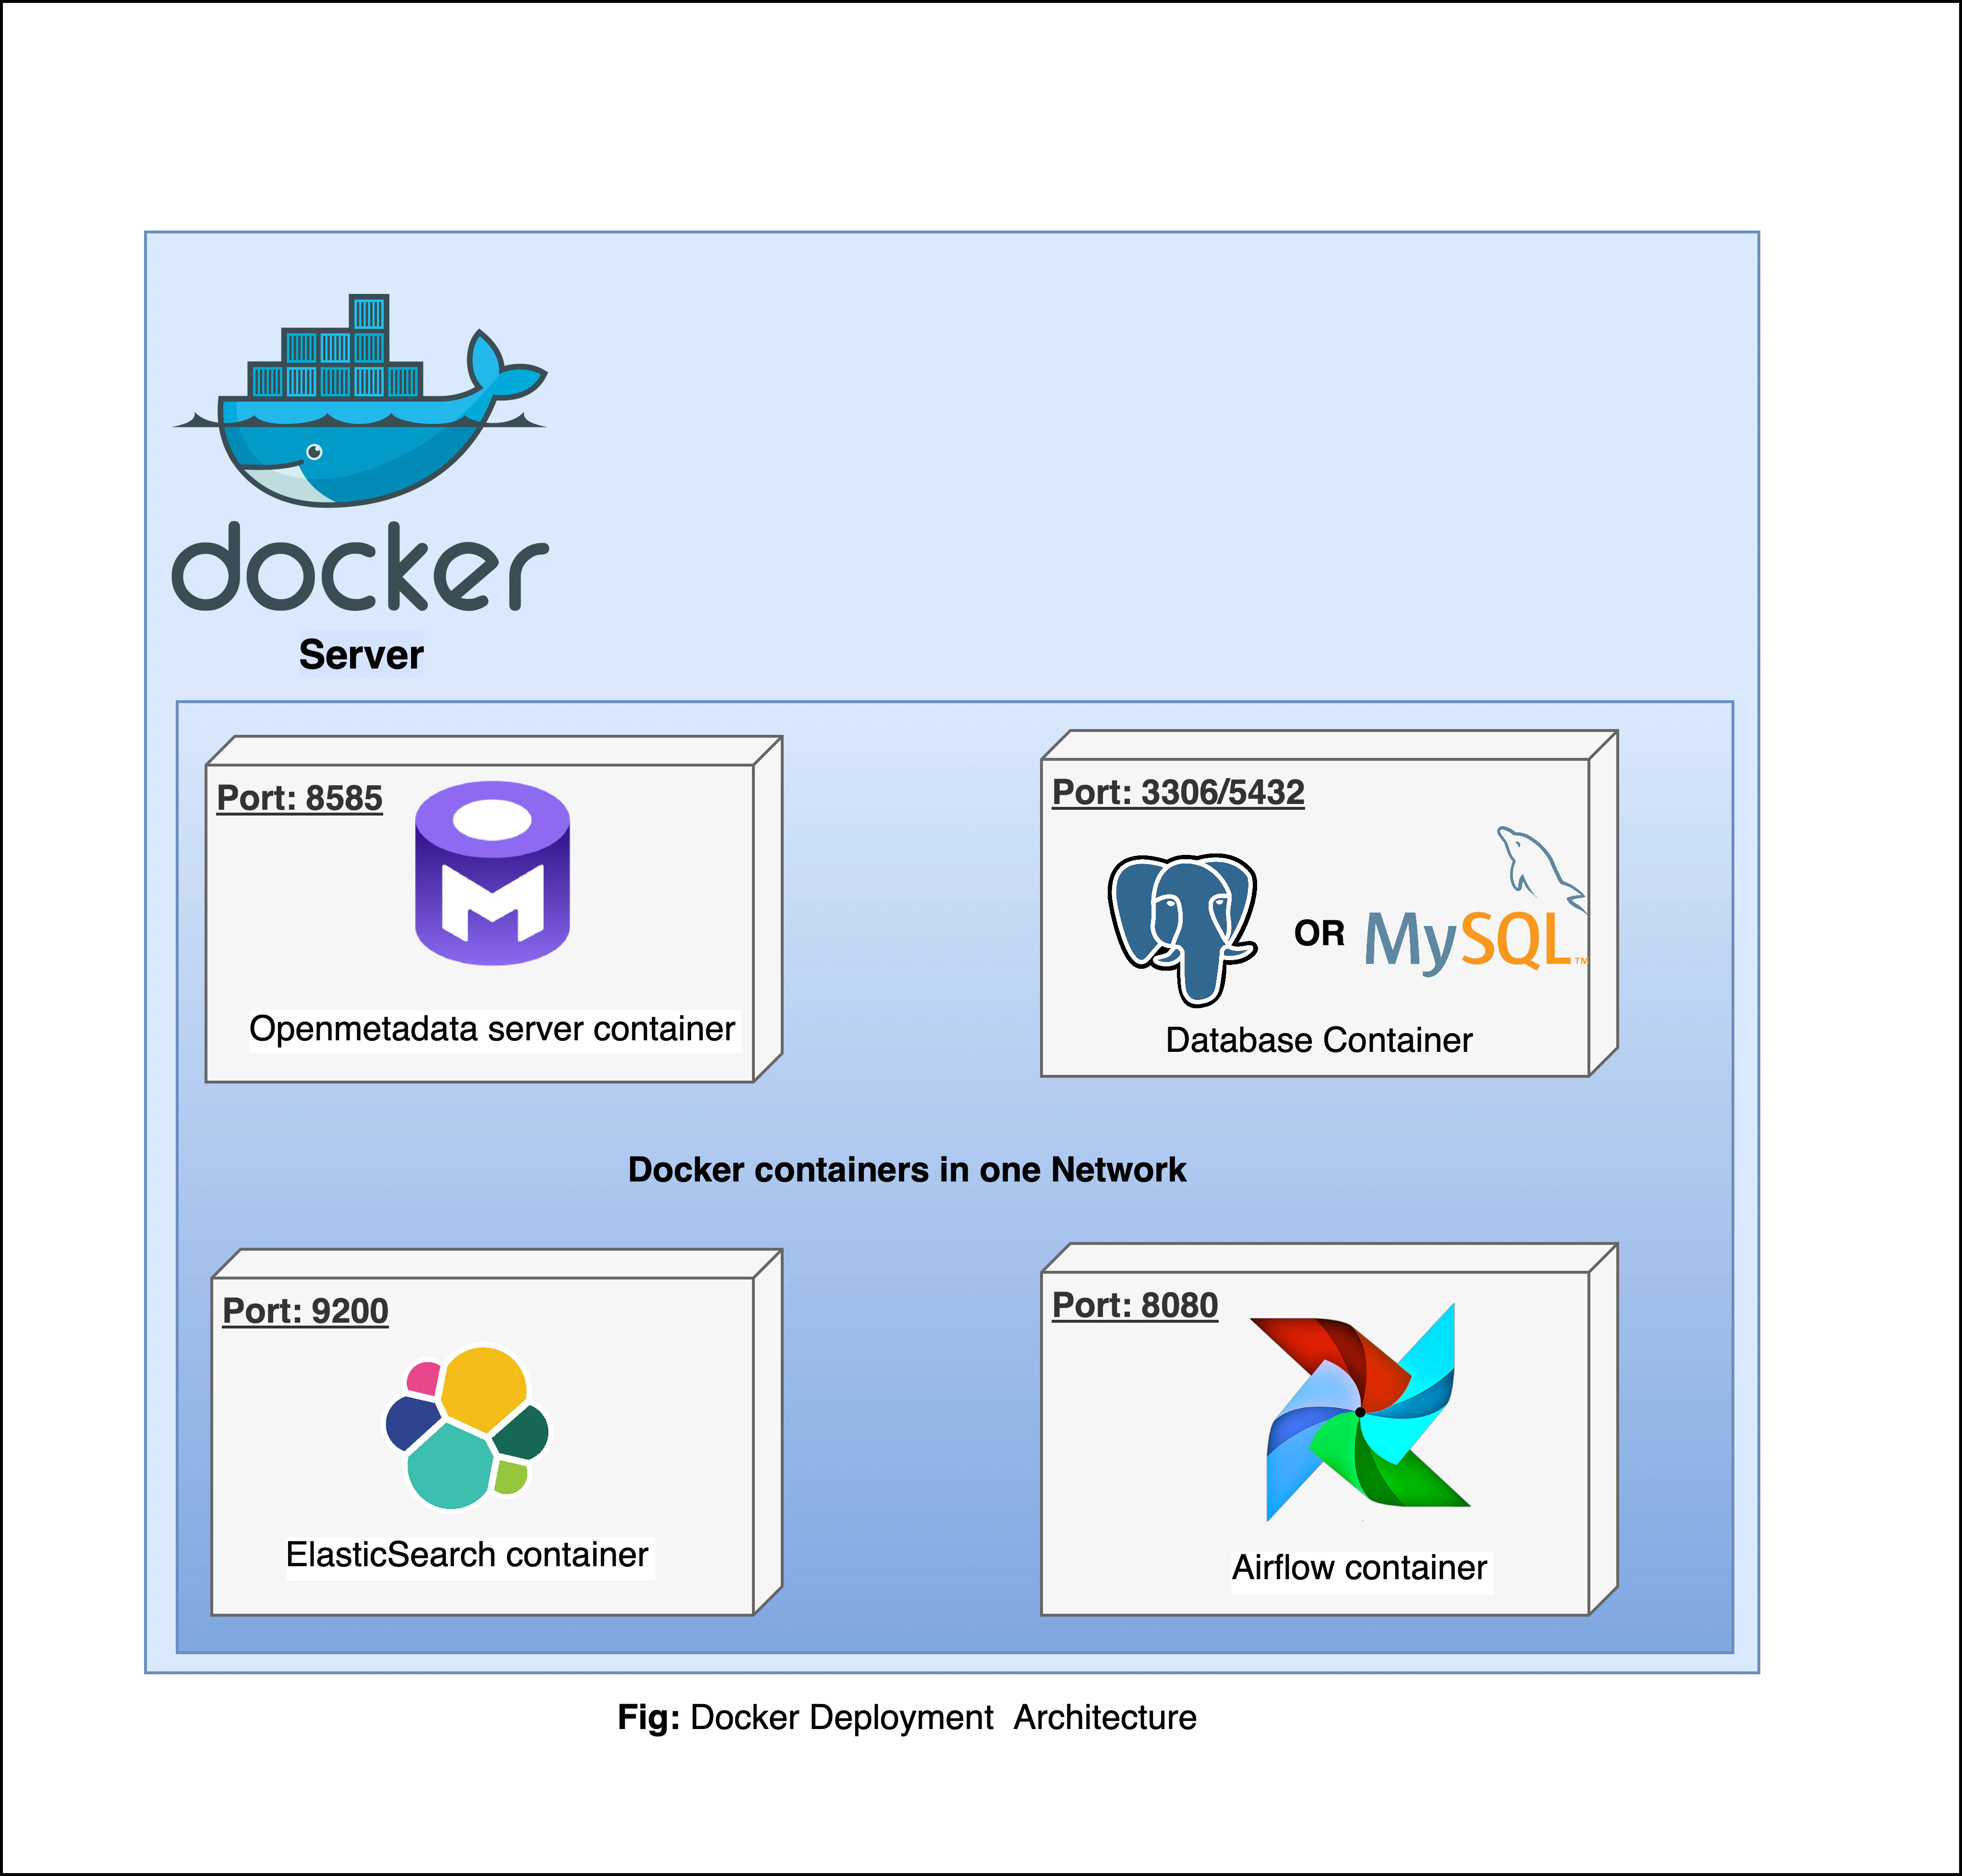
## Docker Deployment Architecture
 ## Prerequisites
### Configure OpenMetadata to use External Database and Search Engine
For Production Deployment using Docker, we recommend bringing your own Databases and ElasticSearch Engine and not rely on quickstart packages.
### Configure External Orchestrator Service (Ingestion Service)
OpenMetadata requires connectors to be scheduled to periodically fetch the metadata, or you can use the OpenMetadata APIs to push the metadata as well
1. OpenMetadata Ingestion Framework is flexible to run on any orchestrator. However, we built an ability to deploy and manage connectors as pipelines from the UI. This requires the Airflow container we ship.
2. If your team prefers to run on any other orchestrator such as prefect, dagster or even GitHub workflows. Please refer to our recent webinar on [How Ingestion Framework works](https://www.youtube.com/watch?v=i7DhG_gZMmE\&list=PLa1l-WDhLreslIS_96s_DT_KdcDyU_Itv\&index=10)
### Docker (version 20.10.0 or higher)
[Docker](https://docs.docker.com/get-started/overview/) is an open-source platform for developing, shipping, and running applications. It enables you to separate your applications from your infrastructure, so you can deliver software quickly using OS-level virtualization. It helps deliver software in packages called Containers.
To check what version of Docker you have, please use the following command.
```commandline theme={null}
docker --version
```
If you need to install Docker, please visit [Get Docker](https://docs.docker.com/get-docker/).
### Docker Compose (version v2.2.3 or greater)
The Docker compose package enables you to define and run multi-container Docker applications. The compose command integrates compose functions into the Docker platform, making them available from the Docker command-line interface ( CLI). The Python packages you will install in the procedure below use compose to deploy OpenMetadata.
* **MacOS X**: Docker on MacOS X ships with compose already available in the Docker CLI.
* **Linux**: To install compose on Linux systems, please visit the Docker CLI command documentation and follow the
instructions.
To verify that the docker compose command is installed and accessible on your system, run the following command.
```commandline theme={null}
docker compose version
```
Upon running this command you should see output similar to the following.
```commandline theme={null}
Docker Compose version v2.2.3
```
#### Install Docker Compose Version 2 on Linux
Follow the instructions [here](https://docs.docker.com/compose/cli-command/#install-on-linux) to install docker compose version 2
1. Run the following command to download the current stable release of Docker Compose
```
DOCKER_CONFIG=${DOCKER_CONFIG:-$HOME/.docker}
mkdir -p $DOCKER_CONFIG/cli-plugins
curl -SL https://github.com/docker/compose/releases/download/v2.2.3/docker-compose-linux-x86_64 -o
$DOCKER_CONFIG/cli-plugins/docker-compose
```
This command installs Compose V2 for the active user under \$HOME directory. To install Docker Compose for all users
on your system, replace` ~/.docker/cli-plugins` with `/usr/local/lib/docker/cli-plugins`.
2. Apply executable permissions to the binary
```
chmod +x $DOCKER_CONFIG/cli-plugins/docker-compose
```
3. Test your installation
```
docker compose version
> Docker Compose version v2.2.3
```
## Steps for Deploying OpenMetadata using Docker
### 1. Create a directory for OpenMetadata
Create a new directory for OpenMetadata and navigate into that directory.
```commandline theme={null}
mkdir openmetadata-docker && cd openmetadata-docker
```
### 2. Download Docker Compose Files from GitHub Releases
Download the Docker Compose files from the [Latest GitHub Releases](https://github.com/open-metadata/OpenMetadata/releases/latest).
The Docker compose file name will be `docker-compose-openmetadata.yml`.
This docker compose file contains only the docker compose services for OpenMetadata Server. Bring up the dependencies as mentioned in the [prerequisites](#configure-openmetadata-to-use-external-database-and-search-engine) section.
You can also run the below command to fetch the docker compose file directly from the terminal -
```bash theme={null}
wget https://github.com/open-metadata/OpenMetadata/releases/download/1.12.6-release/docker-compose-openmetadata.yml
```
### 3. Update Environment Variables required for OpenMetadata Dependencies
In the previous [step](#2.-download-docker-compose-files-from-github-releases), we download the `docker-compose` file.
Identify and update the environment variables in the file to prepare openmetadata configurations.
For MySQL Configurations, update the below environment variables -
```bash theme={null}
...
# Database configuration for MySQL
DB_DRIVER_CLASS="com.mysql.cj.jdbc.Driver"
DB_SCHEME="mysql"
DB_PARAMS="allowPublicKeyRetrieval=true&useSSL=true&serverTimezone=UTC"
DB_USER=""
DB_USER_PASSWORD=""
DB_HOST=""
DB_PORT=""
OM_DATABASE=""
```
For ElasticSearch Configurations, update the below environment variables -
```bash theme={null}
# ElasticSearch Configurations
SEARCH_TYPE="elasticsearch"
ELASTICSEARCH_HOST=""
ELASTICSEARCH_PORT=""
ELASTICSEARCH_SCHEME=""
ELASTICSEARCH_USER=""
ELASTICSEARCH_PASSWORD=""
ELASTICSEARCH_CLUSTER_ALIAS=""
```
For OpenSearch Configurations, update the below environment variables -
```bash theme={null}
# ElasticSearch Configurations
SEARCH_TYPE="opensearch"
ELASTICSEARCH_HOST=""
ELASTICSEARCH_PORT=""
ELASTICSEARCH_SCHEME=""
ELASTICSEARCH_USER=""
ELASTICSEARCH_PASSWORD=""
ELASTICSEARCH_CLUSTER_ALIAS=""
```
If you want to separate indexes for production and non-production environments, you can set the `clusterAlias` in the configuration file.
For Ingestion Configurations, update the below environment variables -
```bash theme={null}
PIPELINE_SERVICE_CLIENT_ENDPOINT=""
PIPELINE_SERVICE_CLIENT_HEALTH_CHECK_INTERVAL="300"
SERVER_HOST_API_URL="/api"
PIPELINE_SERVICE_CLIENT_VERIFY_SSL="no-ssl"
PIPELINE_SERVICE_CLIENT_SSL_CERT_PATH=""
PIPELINE_SERVICE_CLIENT_CLASS_NAME="org.openmetadata.service.clients.pipeline.airflow.AirflowRESTClient"
PIPELINE_SERVICE_IP_INFO_ENABLED="false"
PIPELINE_SERVICE_CLIENT_HOST_IP=""
PIPELINE_SERVICE_CLIENT_SECRETS_MANAGER_LOADER="noop"
AIRFLOW_USERNAME=""
AIRFLOW_PASSWORD=""
AIRFLOW_TIMEOUT="10"
AIRFLOW_TRUST_STORE_PATH=""
AIRFLOW_TRUST_STORE_PASSWORD=""
```
When setting up environment file if your custom password includes any special characters then make sure to follow the steps [here](https://github.com/open-metadata/OpenMetadata/issues/12110#issuecomment-1611341650).
### 4. Start the Docker Compose Services
Run the below command to deploy the OpenMetadata -
```bash theme={null}
docker compose --env-file ./env-mysql up --detach
```
You can validate that all containers are up by running with command `docker ps`.
```commandline theme={null}
❯ docker ps
CONTAINER ID IMAGE COMMAND CREATED STATUS PORTS NAMES
470cc8149826 openmetadata/server:1.12.6 "./openmetadata-star…" 45 seconds ago Up 43 seconds 3306/tcp, 9200/tcp, 9300/tcp, 0.0.0.0:8585-8586->8585-8586/tcp openmetadata_server
```
In a few seconds, you should be able to access the OpenMetadata UI at [http://localhost:8585](http://localhost:8585)
## Next Steps
For port mapping, load balancer setup, AWS services configuration, Docker volumes, and troubleshooting, see
[Docker Advanced Configuration & Troubleshooting](/v1.12.x/deployment/docker/advanced).
## Prerequisites
### Configure OpenMetadata to use External Database and Search Engine
For Production Deployment using Docker, we recommend bringing your own Databases and ElasticSearch Engine and not rely on quickstart packages.
### Configure External Orchestrator Service (Ingestion Service)
OpenMetadata requires connectors to be scheduled to periodically fetch the metadata, or you can use the OpenMetadata APIs to push the metadata as well
1. OpenMetadata Ingestion Framework is flexible to run on any orchestrator. However, we built an ability to deploy and manage connectors as pipelines from the UI. This requires the Airflow container we ship.
2. If your team prefers to run on any other orchestrator such as prefect, dagster or even GitHub workflows. Please refer to our recent webinar on [How Ingestion Framework works](https://www.youtube.com/watch?v=i7DhG_gZMmE\&list=PLa1l-WDhLreslIS_96s_DT_KdcDyU_Itv\&index=10)
### Docker (version 20.10.0 or higher)
[Docker](https://docs.docker.com/get-started/overview/) is an open-source platform for developing, shipping, and running applications. It enables you to separate your applications from your infrastructure, so you can deliver software quickly using OS-level virtualization. It helps deliver software in packages called Containers.
To check what version of Docker you have, please use the following command.
```commandline theme={null}
docker --version
```
If you need to install Docker, please visit [Get Docker](https://docs.docker.com/get-docker/).
### Docker Compose (version v2.2.3 or greater)
The Docker compose package enables you to define and run multi-container Docker applications. The compose command integrates compose functions into the Docker platform, making them available from the Docker command-line interface ( CLI). The Python packages you will install in the procedure below use compose to deploy OpenMetadata.
* **MacOS X**: Docker on MacOS X ships with compose already available in the Docker CLI.
* **Linux**: To install compose on Linux systems, please visit the Docker CLI command documentation and follow the
instructions.
To verify that the docker compose command is installed and accessible on your system, run the following command.
```commandline theme={null}
docker compose version
```
Upon running this command you should see output similar to the following.
```commandline theme={null}
Docker Compose version v2.2.3
```
#### Install Docker Compose Version 2 on Linux
Follow the instructions [here](https://docs.docker.com/compose/cli-command/#install-on-linux) to install docker compose version 2
1. Run the following command to download the current stable release of Docker Compose
```
DOCKER_CONFIG=${DOCKER_CONFIG:-$HOME/.docker}
mkdir -p $DOCKER_CONFIG/cli-plugins
curl -SL https://github.com/docker/compose/releases/download/v2.2.3/docker-compose-linux-x86_64 -o
$DOCKER_CONFIG/cli-plugins/docker-compose
```
This command installs Compose V2 for the active user under \$HOME directory. To install Docker Compose for all users
on your system, replace` ~/.docker/cli-plugins` with `/usr/local/lib/docker/cli-plugins`.
2. Apply executable permissions to the binary
```
chmod +x $DOCKER_CONFIG/cli-plugins/docker-compose
```
3. Test your installation
```
docker compose version
> Docker Compose version v2.2.3
```
## Steps for Deploying OpenMetadata using Docker
### 1. Create a directory for OpenMetadata
Create a new directory for OpenMetadata and navigate into that directory.
```commandline theme={null}
mkdir openmetadata-docker && cd openmetadata-docker
```
### 2. Download Docker Compose Files from GitHub Releases
Download the Docker Compose files from the [Latest GitHub Releases](https://github.com/open-metadata/OpenMetadata/releases/latest).
The Docker compose file name will be `docker-compose-openmetadata.yml`.
This docker compose file contains only the docker compose services for OpenMetadata Server. Bring up the dependencies as mentioned in the [prerequisites](#configure-openmetadata-to-use-external-database-and-search-engine) section.
You can also run the below command to fetch the docker compose file directly from the terminal -
```bash theme={null}
wget https://github.com/open-metadata/OpenMetadata/releases/download/1.12.6-release/docker-compose-openmetadata.yml
```
### 3. Update Environment Variables required for OpenMetadata Dependencies
In the previous [step](#2.-download-docker-compose-files-from-github-releases), we download the `docker-compose` file.
Identify and update the environment variables in the file to prepare openmetadata configurations.
For MySQL Configurations, update the below environment variables -
```bash theme={null}
...
# Database configuration for MySQL
DB_DRIVER_CLASS="com.mysql.cj.jdbc.Driver"
DB_SCHEME="mysql"
DB_PARAMS="allowPublicKeyRetrieval=true&useSSL=true&serverTimezone=UTC"
DB_USER=""
DB_USER_PASSWORD=""
DB_HOST=""
DB_PORT=""
OM_DATABASE=""
```
For ElasticSearch Configurations, update the below environment variables -
```bash theme={null}
# ElasticSearch Configurations
SEARCH_TYPE="elasticsearch"
ELASTICSEARCH_HOST=""
ELASTICSEARCH_PORT=""
ELASTICSEARCH_SCHEME=""
ELASTICSEARCH_USER=""
ELASTICSEARCH_PASSWORD=""
ELASTICSEARCH_CLUSTER_ALIAS=""
```
For OpenSearch Configurations, update the below environment variables -
```bash theme={null}
# ElasticSearch Configurations
SEARCH_TYPE="opensearch"
ELASTICSEARCH_HOST=""
ELASTICSEARCH_PORT=""
ELASTICSEARCH_SCHEME=""
ELASTICSEARCH_USER=""
ELASTICSEARCH_PASSWORD=""
ELASTICSEARCH_CLUSTER_ALIAS=""
```
If you want to separate indexes for production and non-production environments, you can set the `clusterAlias` in the configuration file.
For Ingestion Configurations, update the below environment variables -
```bash theme={null}
PIPELINE_SERVICE_CLIENT_ENDPOINT=""
PIPELINE_SERVICE_CLIENT_HEALTH_CHECK_INTERVAL="300"
SERVER_HOST_API_URL="/api"
PIPELINE_SERVICE_CLIENT_VERIFY_SSL="no-ssl"
PIPELINE_SERVICE_CLIENT_SSL_CERT_PATH=""
PIPELINE_SERVICE_CLIENT_CLASS_NAME="org.openmetadata.service.clients.pipeline.airflow.AirflowRESTClient"
PIPELINE_SERVICE_IP_INFO_ENABLED="false"
PIPELINE_SERVICE_CLIENT_HOST_IP=""
PIPELINE_SERVICE_CLIENT_SECRETS_MANAGER_LOADER="noop"
AIRFLOW_USERNAME=""
AIRFLOW_PASSWORD=""
AIRFLOW_TIMEOUT="10"
AIRFLOW_TRUST_STORE_PATH=""
AIRFLOW_TRUST_STORE_PASSWORD=""
```
When setting up environment file if your custom password includes any special characters then make sure to follow the steps [here](https://github.com/open-metadata/OpenMetadata/issues/12110#issuecomment-1611341650).
### 4. Start the Docker Compose Services
Run the below command to deploy the OpenMetadata -
```bash theme={null}
docker compose --env-file ./env-mysql up --detach
```
You can validate that all containers are up by running with command `docker ps`.
```commandline theme={null}
❯ docker ps
CONTAINER ID IMAGE COMMAND CREATED STATUS PORTS NAMES
470cc8149826 openmetadata/server:1.12.6 "./openmetadata-star…" 45 seconds ago Up 43 seconds 3306/tcp, 9200/tcp, 9300/tcp, 0.0.0.0:8585-8586->8585-8586/tcp openmetadata_server
```
In a few seconds, you should be able to access the OpenMetadata UI at [http://localhost:8585](http://localhost:8585)
## Next Steps
For port mapping, load balancer setup, AWS services configuration, Docker volumes, and troubleshooting, see
[Docker Advanced Configuration & Troubleshooting](/v1.12.x/deployment/docker/advanced).