> ## Documentation Index
> Fetch the complete documentation index at: https://docs.open-metadata.org/llms.txt
> Use this file to discover all available pages before exploring further.
# Bare Metal Upgrade Steps | Official Documentation
> Step-by-step upgrade process for OpenMetadata on bare-metal infrastructure, including database migration and post-upgrade tasks.
# Bare Metal Upgrade Steps
Follow the steps below to upgrade your OpenMetadata bare-metal deployment. Before proceeding, make sure you have completed the [prerequisites](/v1.12.x/deployment/upgrade/bare-metal).
## Upgrade process
## Step 1: Download the binaries for the release you want to install
OpenMetadata release binaries are maintained as GitHub releases.
To download a specific release binary:
* Visit [github.com/open-metadata/OpenMetadata/releases](https://github.com/open-metadata/OpenMetadata/releases). The latest
release will be at the top of this page.
* Locate the Assets' section for the release you want to upgrade to.
* Download the release binaries. The release binaries will be in a compressed tar file named using the following
convention, `openmetadata-x.y.z.tar.gz` Where `x`, `y`, `z` are the major, minor, and patch release numbers, respectively.
## Step 2: Extract the release binaries from the download file
Using the command-line tool or application of your choice, extract the release binaries.
For example, to extract using `tar`, run the following command.
```commandline theme={null}
tar xfz openmetadata-*.tar.gz
```
This will create a directory with the same name as the download file minus the `.tar` and `.gz` extensions.
## Step 3: Navigate into the directory created by extracting the release binaries
Change into the new directory by issuing a command similar to the following.
```commandline theme={null}
cd openmetadata-x.y.z
```
For example, to navigate into the directory created by issuing the tar command above, you would run the following
command.
```commandline theme={null}
cd openmetadata-1.1.0
```
## Step 4: Stop the OpenMetadata server
OpenMetadata ships with a few control scripts. One is `openmetadata.sh`. This script enables you to start, stop, and
perform other deployment operations on the OpenMetadata server.
Most OpenMetadata releases will require you to migrate your data to updated schemas.
Before you migrate your data to the new release you are upgrading to, stop the OpenMetadata server from the
directory of your current installation by running the following command:
```commandline theme={null}
./bin/openmetadata.sh stop
```
## Step 5: Migrate the database schemas and ElasticSearch indexes
The `bootstrap/openmetadata-ops.sh` script enables you to perform a number of operations on the OpenMetadata database (in
MySQL) and index (in Elasticsearch).
```commandline theme={null}
./bootstrap/openmetadata-ops.sh migrate
```
## Step 6: Restart the OpenMetadata server
Once you've dropped and recreated your data in the new version, restart the OpenMetadata server using the new release
binaries. You may restart the server by running the following command.
```commandline theme={null}
./bin/openmetadata.sh start
```
## Post-Upgrade Steps
### Reindex
#### With UI
Go to `Settings` -> `Applications` -> `Search Indexing`
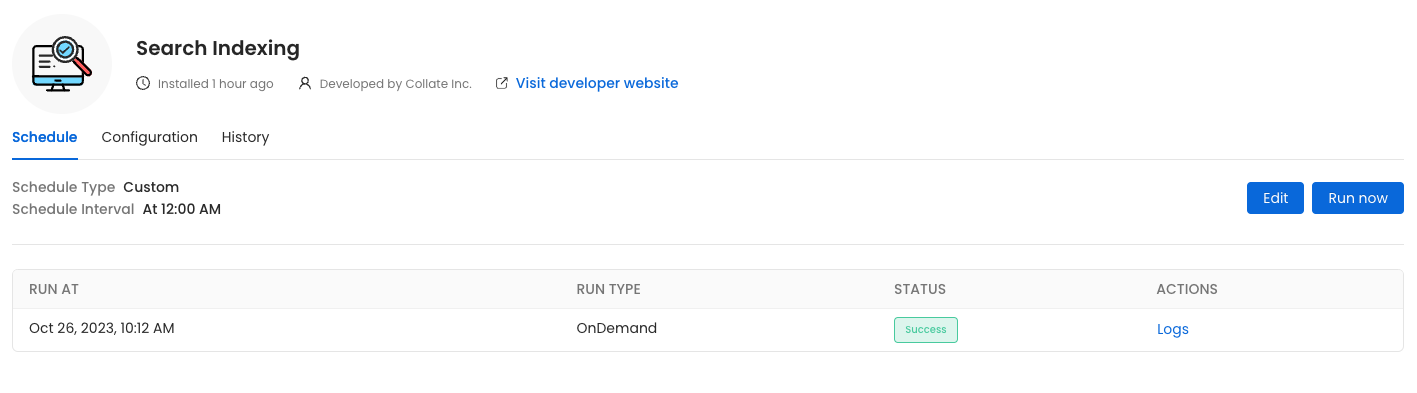 Before initiating the process by clicking `Run Now`, ensure that the `Recreate Indexes` option is enabled to allow rebuilding the indexes as needed.
In the configuration section, you can select the entities you want to reindex.
Before initiating the process by clicking `Run Now`, ensure that the `Recreate Indexes` option is enabled to allow rebuilding the indexes as needed.
In the configuration section, you can select the entities you want to reindex.
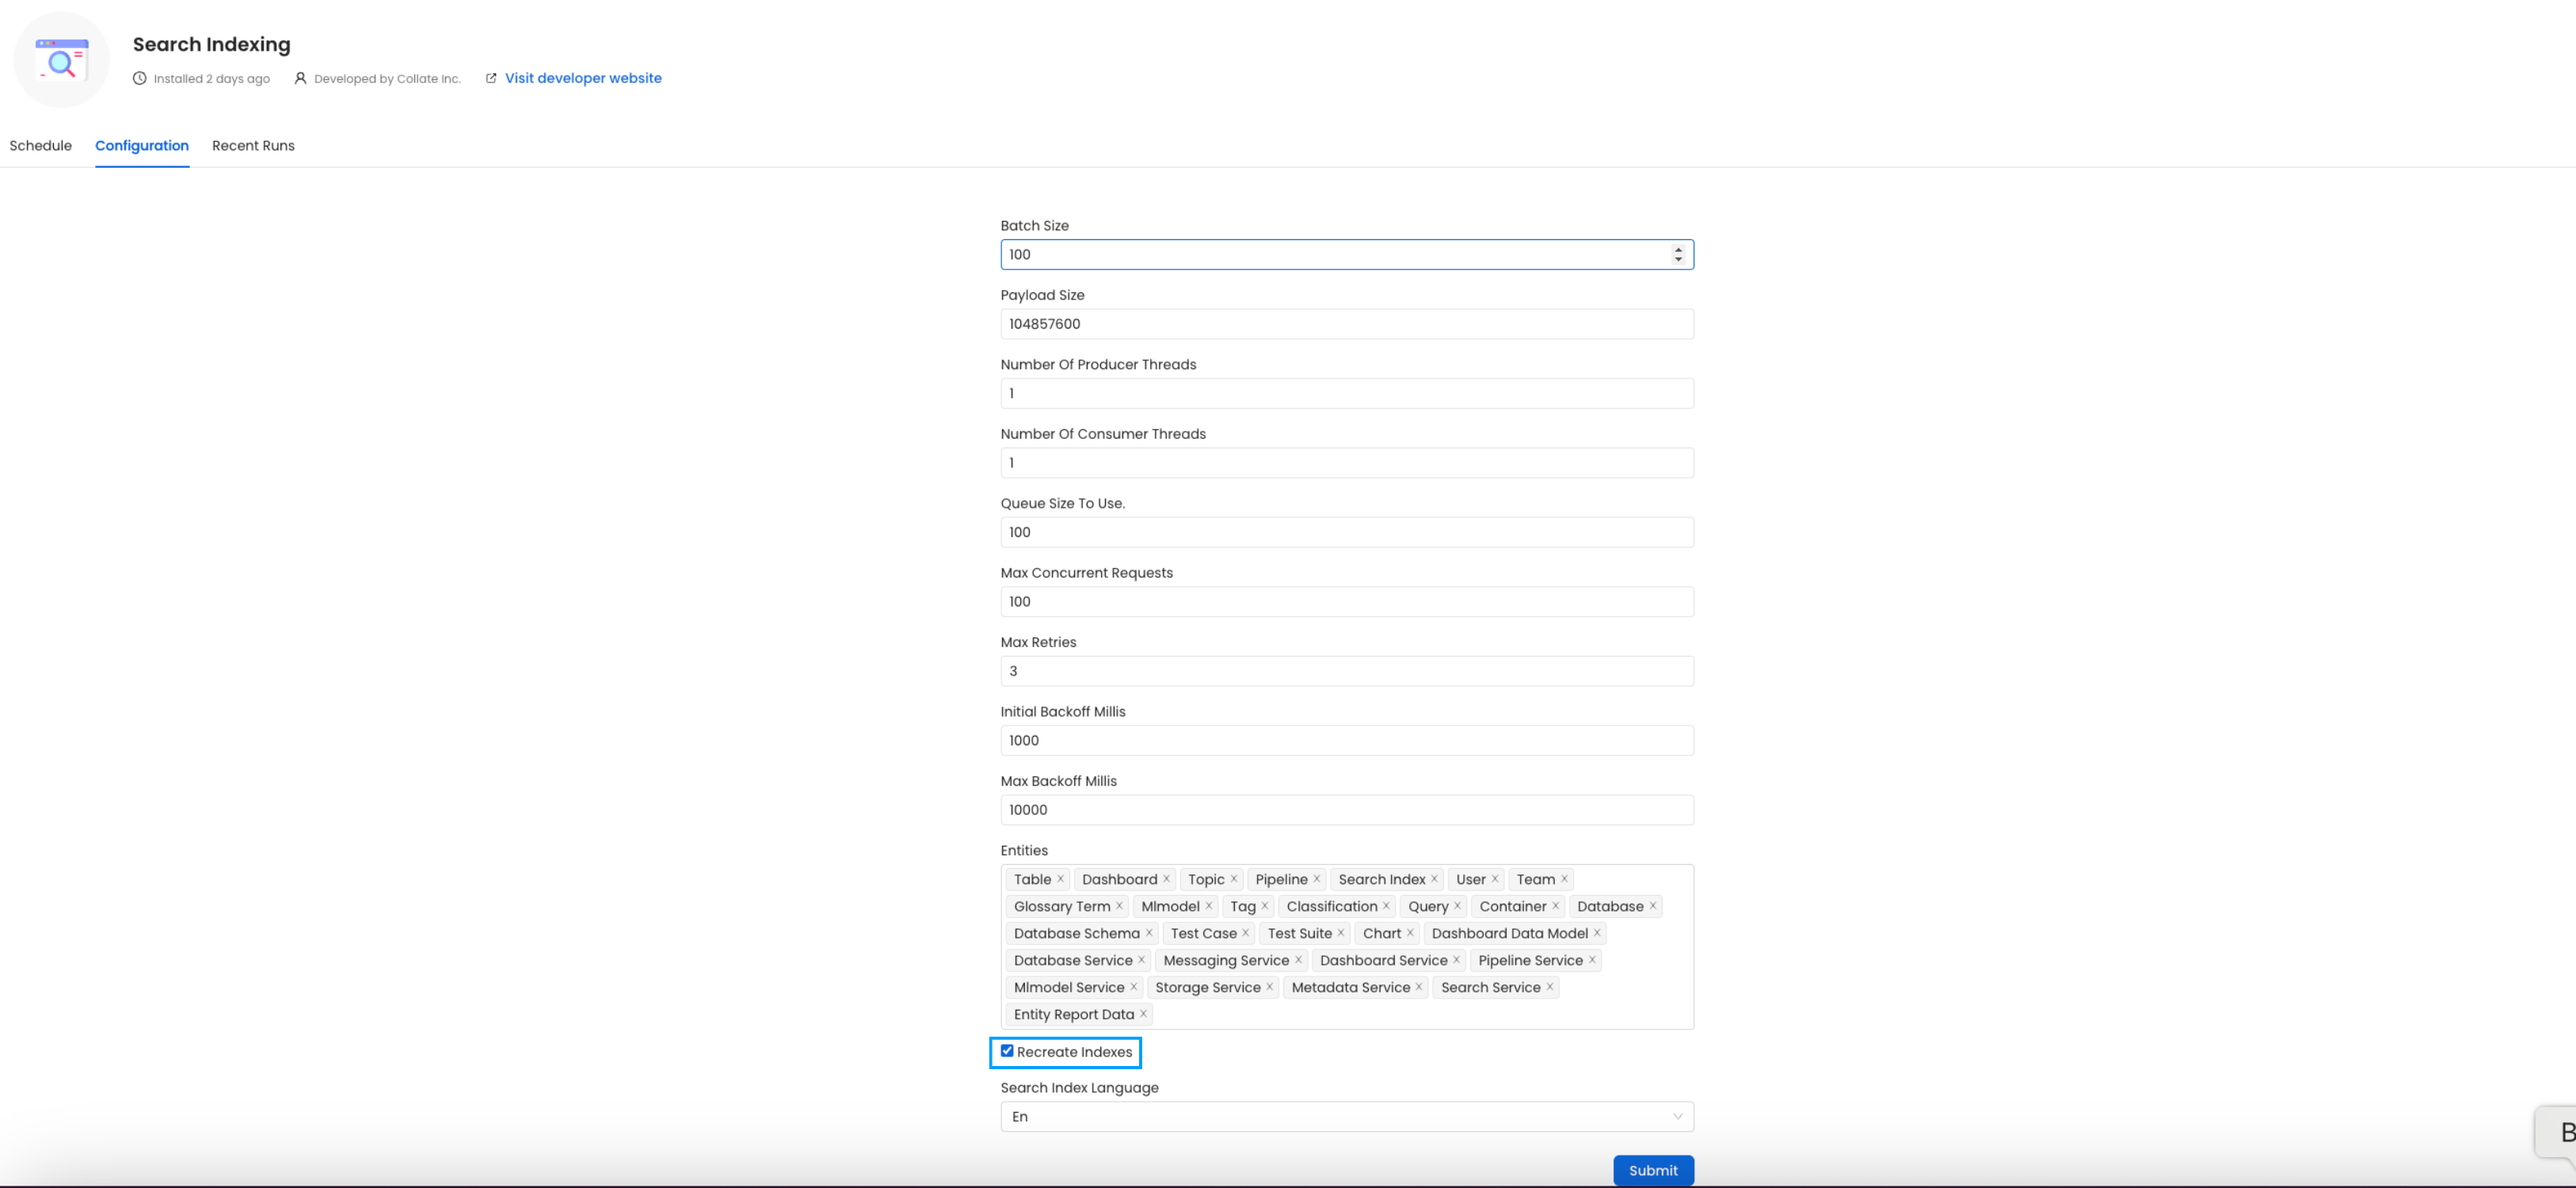 Since this is required after the upgrade, we want to reindex `All` the entities.
### (Optional) Update your OpenMetadata Ingestion Client
If you are running the ingestion workflows **externally** or using a custom Airflow installation, you need to make sure that the Python Client you use is aligned
with the OpenMetadata server version.
For example, if you are upgrading the server to the version `x.y.z`, you will need to update your client with
```bash theme={null}
pip install openmetadata-ingestion[]==x.y.z
```
#### With Kubernetes
Follow these steps to reindex using the CLI:
1. List the CronJobs
Use the following command to check the available CronJobs:
```bash theme={null}
kubectl get cronjobs
```
Upon running this command you should see output similar to the following.
```CommandLine theme={null}
kubectl get cronjobs
NAME SCHEDULE TIMEZONE SUSPEND ACTIVE LAST SCHEDULE AGE
cron-reindex 0/5 * * * * True 0 31m
```
2. Create a Job from a CronJob
Create a one-time job from an existing CronJob using the following command:
```bash theme={null}
kubectl create job --from=cronjob/cron-deploy-pipelines
```
Replace `` with the actual name of the job.
Upon running this command you should see output similar to the following.
```CommandLine theme={null}
kubectl create job --from=cronjob/cron-reindex cron-reindex-one
job.batch/cron-reindex-one created
```
3. Check the Job Status
Verify the status of the created job with:
```bash theme={null}
kubectl get jobs
```
Upon running this command you should see output similar to the following.
```CommandLine theme={null}
kubectl get jobs
NAME STATUS COMPLETIONS DURATION AGE
cron-reindex-one Complete 1/1 20s 109s
```
4. view logs
To view the logs use the below command.
```bash theme={null}
kubectl logs job/
```
Replace `` with the actual job name.
The `plugin` parameter is a list of the sources that we want to ingest. An example would look like this `openmetadata-ingestion[mysql,snowflake,s3]==1.2.0`.
You will find specific instructions for each connector in the Connectors section.
Moreover, if working with your own Airflow deployment - not the `openmetadata-ingestion` image - you will need to upgrade
as well the `openmetadata-managed-apis` version:
```bash theme={null}
pip install openmetadata-managed-apis==x.y.z
```
### Re Deploy Ingestion Pipelines
#### With UI
Go to `Settings` -> `{Services}` -> `{Databases}` -> `Pipelines`
Since this is required after the upgrade, we want to reindex `All` the entities.
### (Optional) Update your OpenMetadata Ingestion Client
If you are running the ingestion workflows **externally** or using a custom Airflow installation, you need to make sure that the Python Client you use is aligned
with the OpenMetadata server version.
For example, if you are upgrading the server to the version `x.y.z`, you will need to update your client with
```bash theme={null}
pip install openmetadata-ingestion[]==x.y.z
```
#### With Kubernetes
Follow these steps to reindex using the CLI:
1. List the CronJobs
Use the following command to check the available CronJobs:
```bash theme={null}
kubectl get cronjobs
```
Upon running this command you should see output similar to the following.
```CommandLine theme={null}
kubectl get cronjobs
NAME SCHEDULE TIMEZONE SUSPEND ACTIVE LAST SCHEDULE AGE
cron-reindex 0/5 * * * * True 0 31m
```
2. Create a Job from a CronJob
Create a one-time job from an existing CronJob using the following command:
```bash theme={null}
kubectl create job --from=cronjob/cron-deploy-pipelines
```
Replace `` with the actual name of the job.
Upon running this command you should see output similar to the following.
```CommandLine theme={null}
kubectl create job --from=cronjob/cron-reindex cron-reindex-one
job.batch/cron-reindex-one created
```
3. Check the Job Status
Verify the status of the created job with:
```bash theme={null}
kubectl get jobs
```
Upon running this command you should see output similar to the following.
```CommandLine theme={null}
kubectl get jobs
NAME STATUS COMPLETIONS DURATION AGE
cron-reindex-one Complete 1/1 20s 109s
```
4. view logs
To view the logs use the below command.
```bash theme={null}
kubectl logs job/
```
Replace `` with the actual job name.
The `plugin` parameter is a list of the sources that we want to ingest. An example would look like this `openmetadata-ingestion[mysql,snowflake,s3]==1.2.0`.
You will find specific instructions for each connector in the Connectors section.
Moreover, if working with your own Airflow deployment - not the `openmetadata-ingestion` image - you will need to upgrade
as well the `openmetadata-managed-apis` version:
```bash theme={null}
pip install openmetadata-managed-apis==x.y.z
```
### Re Deploy Ingestion Pipelines
#### With UI
Go to `Settings` -> `{Services}` -> `{Databases}` -> `Pipelines`
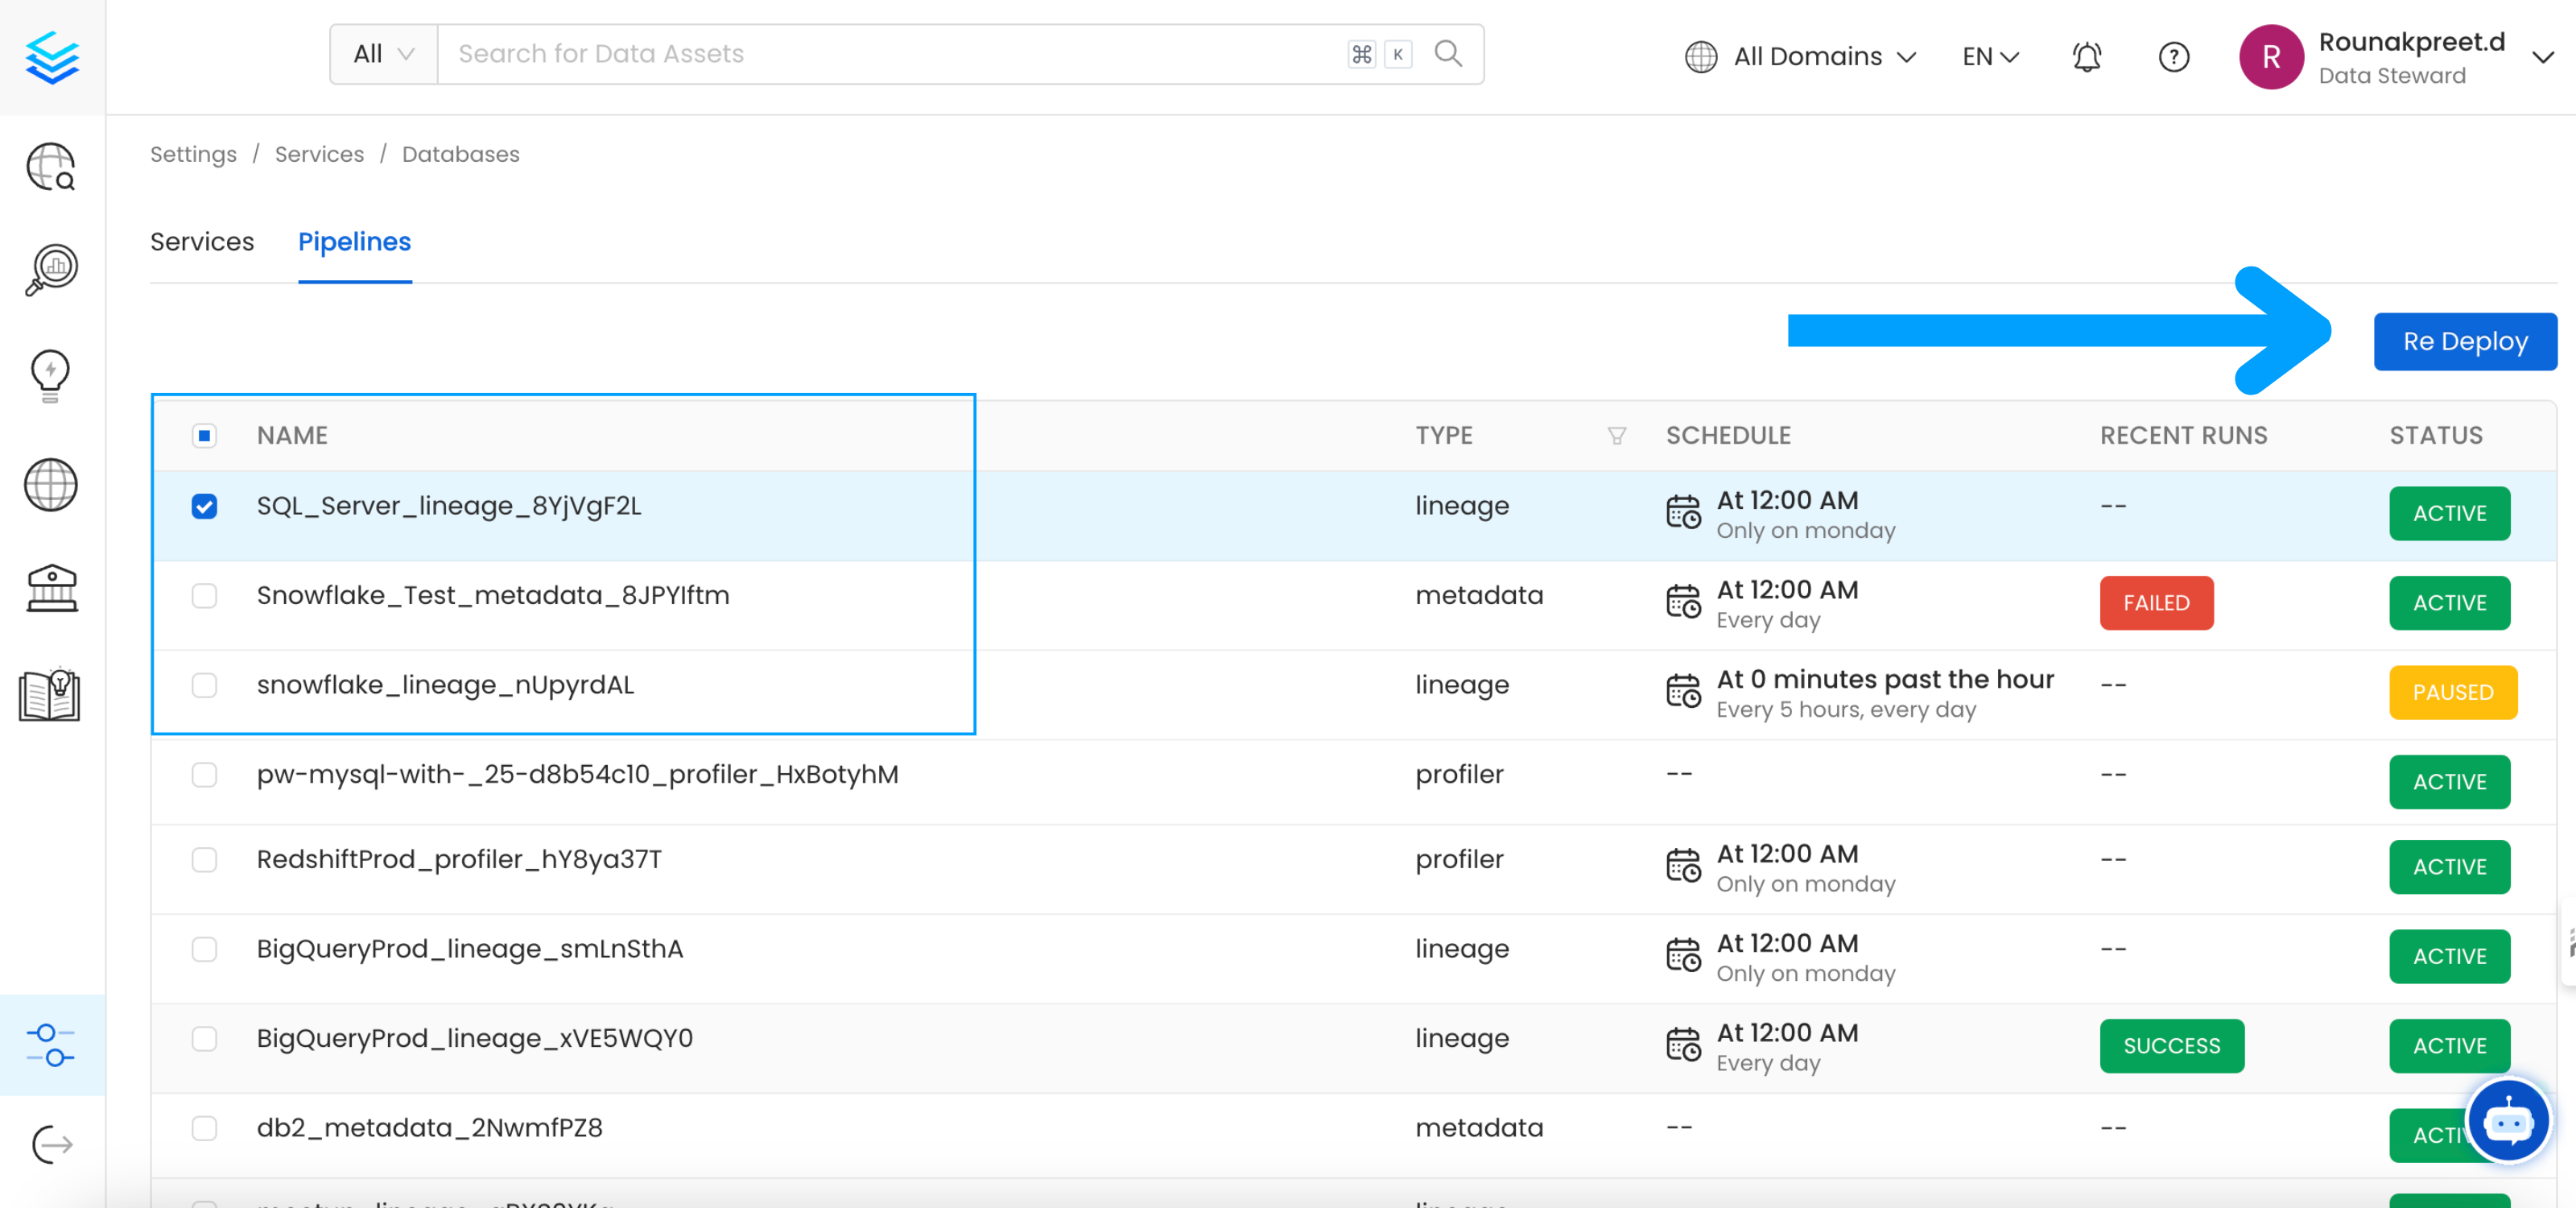 Select the pipelines you want to Re Deploy click `Re Deploy`.
#### With Kubernetes
Follow these steps to deploy pipelines using the CLI:
1. List the CronJobs
Use the following command to check the available CronJobs:
```bash theme={null}
kubectl get cronjobs
```
Upon running this command you should see output similar to the following.
```commandline theme={null}
kubectl get cronjobs
NAME SCHEDULE TIMEZONE SUSPEND ACTIVE LAST SCHEDULE AGE
cron-deploy-pipelines 0/5 * * * * True 0 4m7s
```
2. Create a Job from a CronJob
Create a one-time job from an existing CronJob using the following command:
```bash theme={null}
kubectl create job --from=cronjob/cron-reindex
```
Replace `` with the actual name of the job.
Upon running this command you should see output similar to the following.
```commandline theme={null}
kubectl create job --from=cronjob/cron-deploy-pipelines cron-deploy-pipeline-one
job.batch/cron-deploy-pipeline-one created
```
3. Check the Job Status
Verify the status of the created job with:
```bash theme={null}
kubectl get jobs
```
Upon running this command you should see output similar to the following.
```CommandLine theme={null}
kubectl get jobs
NAME STATUS COMPLETIONS DURATION AGE
cron-deploy-pipeline-one Complete 1/1 13s 3m35s
```
4. view logs
To view the logs use the below command.
```bash theme={null}
kubectl logs job/
```
Replace `` with the actual job name.
If you are seeing broken dags select all the pipelines from all the services and re deploy the pipelines.
# Openmetadata-ops Script
## Overview
The `openmetadata-ops` script is designed to manage and migrate databases and search indexes, reindex existing data into Elastic Search or OpenSearch, and redeploy service pipelines.
## Usage
```bash theme={null}
sh openmetadata-ops.sh [-dhV] [COMMAND]
```
#### Commands
* analyze-tables
Migrates secrets from the database to the configured Secrets Manager. Note that this command does not support migrating between external Secrets Managers.
* changelog
Prints the change log of database migration.
* check-connection
Checks if a connection can be successfully obtained for the target database.
* deploy-pipelines
Deploys all the service pipelines.
* drop-create
Deletes any tables in the configured database and creates new tables based on the current version of OpenMetadata. This command also re-creates the search indexes.
* info
Shows the list of migrations applied and the pending migrations waiting to be applied on the target database.
* migrate
Migrates the OpenMetadata database schema and search index mappings.
* migrate-secrets
Migrates secrets from the database to the configured Secrets Manager. Note that this command does not support migrating between external Secrets Managers.
* reindex
Reindexes data into the search engine from the command line.
* repair
Repairs the DATABASE\_CHANGE\_LOG table, which is used to track all the migrations on the target database. This involves removing entries for the failed migrations and updating the checksum of migrations already applied on the target database.
* validate
Checks if all the migrations have been applied on the target database.
### Examples
Display Help To display the help message:
```bash theme={null}
sh openmetadata-ops.sh --help
```
### Migrate Database Schema
To migrate the database schema and search index mappings:
```bash theme={null}
sh openmetadata-ops.sh migrate
```
### Reindex Data
To reindex data into the search engine:
```bash theme={null}
sh openmetadata-ops.sh reindex
```
Select the pipelines you want to Re Deploy click `Re Deploy`.
#### With Kubernetes
Follow these steps to deploy pipelines using the CLI:
1. List the CronJobs
Use the following command to check the available CronJobs:
```bash theme={null}
kubectl get cronjobs
```
Upon running this command you should see output similar to the following.
```commandline theme={null}
kubectl get cronjobs
NAME SCHEDULE TIMEZONE SUSPEND ACTIVE LAST SCHEDULE AGE
cron-deploy-pipelines 0/5 * * * * True 0 4m7s
```
2. Create a Job from a CronJob
Create a one-time job from an existing CronJob using the following command:
```bash theme={null}
kubectl create job --from=cronjob/cron-reindex
```
Replace `` with the actual name of the job.
Upon running this command you should see output similar to the following.
```commandline theme={null}
kubectl create job --from=cronjob/cron-deploy-pipelines cron-deploy-pipeline-one
job.batch/cron-deploy-pipeline-one created
```
3. Check the Job Status
Verify the status of the created job with:
```bash theme={null}
kubectl get jobs
```
Upon running this command you should see output similar to the following.
```CommandLine theme={null}
kubectl get jobs
NAME STATUS COMPLETIONS DURATION AGE
cron-deploy-pipeline-one Complete 1/1 13s 3m35s
```
4. view logs
To view the logs use the below command.
```bash theme={null}
kubectl logs job/
```
Replace `` with the actual job name.
If you are seeing broken dags select all the pipelines from all the services and re deploy the pipelines.
# Openmetadata-ops Script
## Overview
The `openmetadata-ops` script is designed to manage and migrate databases and search indexes, reindex existing data into Elastic Search or OpenSearch, and redeploy service pipelines.
## Usage
```bash theme={null}
sh openmetadata-ops.sh [-dhV] [COMMAND]
```
#### Commands
* analyze-tables
Migrates secrets from the database to the configured Secrets Manager. Note that this command does not support migrating between external Secrets Managers.
* changelog
Prints the change log of database migration.
* check-connection
Checks if a connection can be successfully obtained for the target database.
* deploy-pipelines
Deploys all the service pipelines.
* drop-create
Deletes any tables in the configured database and creates new tables based on the current version of OpenMetadata. This command also re-creates the search indexes.
* info
Shows the list of migrations applied and the pending migrations waiting to be applied on the target database.
* migrate
Migrates the OpenMetadata database schema and search index mappings.
* migrate-secrets
Migrates secrets from the database to the configured Secrets Manager. Note that this command does not support migrating between external Secrets Managers.
* reindex
Reindexes data into the search engine from the command line.
* repair
Repairs the DATABASE\_CHANGE\_LOG table, which is used to track all the migrations on the target database. This involves removing entries for the failed migrations and updating the checksum of migrations already applied on the target database.
* validate
Checks if all the migrations have been applied on the target database.
### Examples
Display Help To display the help message:
```bash theme={null}
sh openmetadata-ops.sh --help
```
### Migrate Database Schema
To migrate the database schema and search index mappings:
```bash theme={null}
sh openmetadata-ops.sh migrate
```
### Reindex Data
To reindex data into the search engine:
```bash theme={null}
sh openmetadata-ops.sh reindex
```