Run the ingestion from the OpenMetadata UI
When you create and manage ingestion workflows from the OpenMetadata, under the hood we need to communicate with an orchestration system. It does not matter which one, but we need it to have a set of APIs to create, run, fetch the logs, etc. of our workflows.
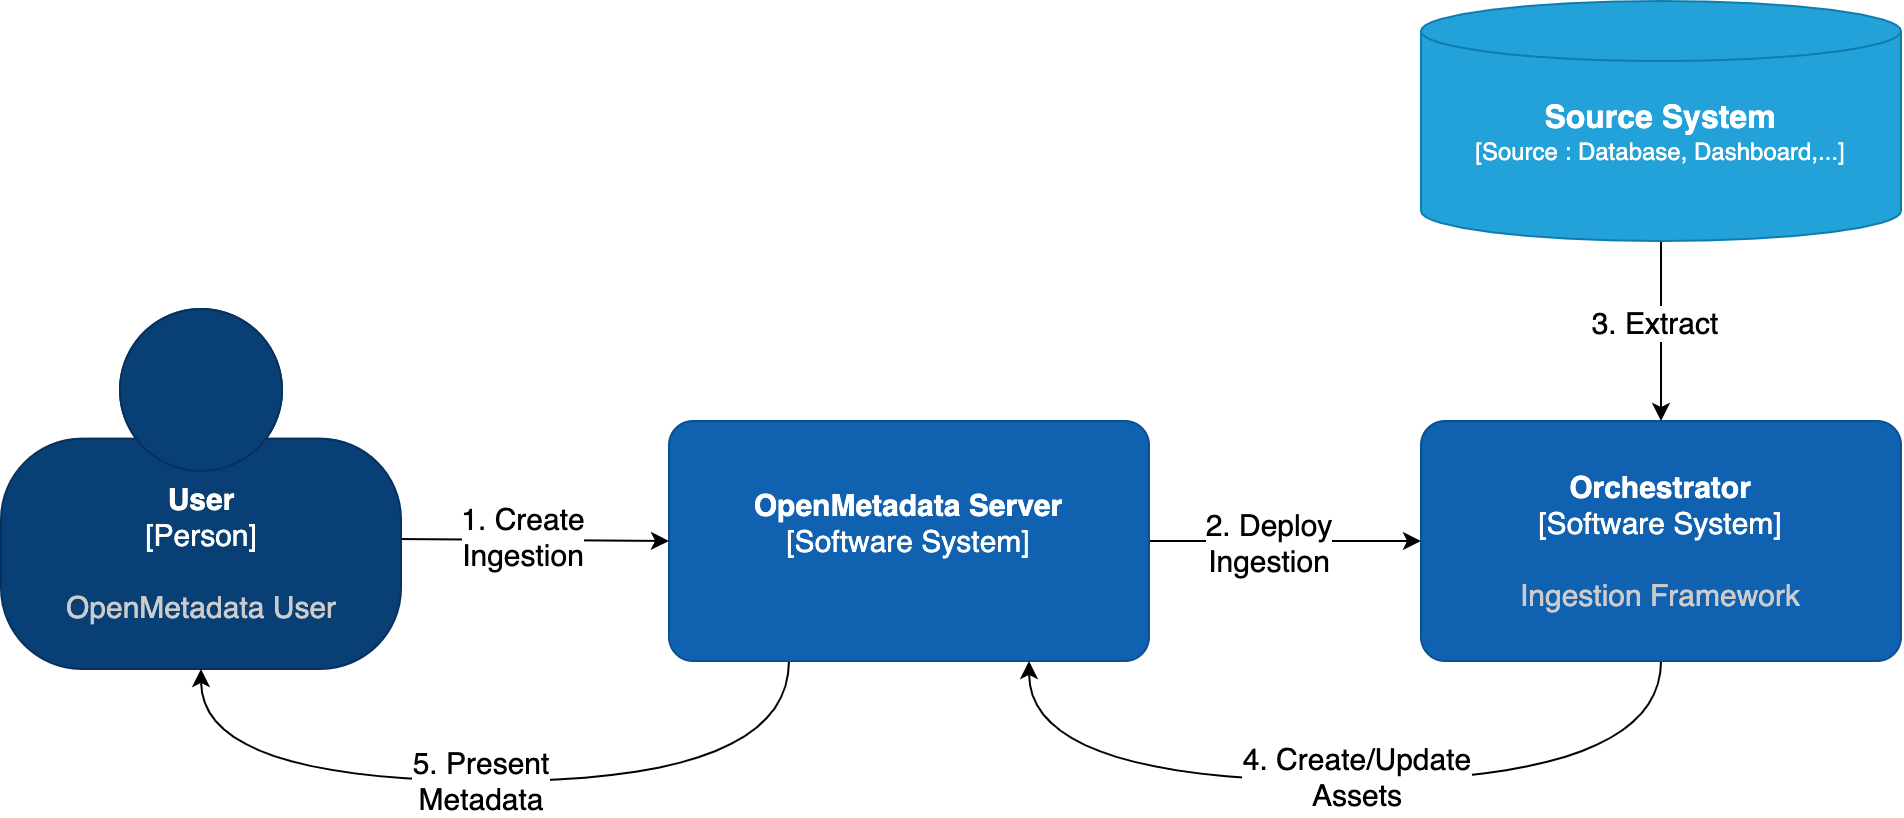
OpenMetadata Ingestion Orchestration
Out of the box, OpenMetadata comes with such integration with Airflow. In this guide, we will show you how to manage ingestions from OpenMetadata by linking it to an Airflow service.
Advanced note for developers: We have an interface that can be extended to bring support to any other orchestrator. You can follow the implementation we have for Airflow as a starting point.
- If you do not have an Airflow service up and running on your platform, we provide a custom Docker image, which already contains the OpenMetadata ingestion packages and custom Airflow APIs to deploy Workflows from the UI as well. This is the simplest approach.
- If you already have Airflow up and running and want to use it for the metadata ingestion, you will need to install the ingestion modules to the host. You can find more information on how to do this in the Custom Airflow Installation section.
Airflow permissions
These are the permissions required by the user that will manage the communication between the OpenMetadata Server and Airflow's Webserver:
User permissions is enough for these requirements.
You can find more information on Airflow's Access Control here.
Shared Volumes
The Airflow Webserver, Scheduler and Workers - if using a distributed setup - need to have access to the same shared volumes with RWX permissions.
We have specific instructions on how to set up the shared volumes in Kubernetes depending on your cloud deployment here.
Using the OpenMetadata Ingestion Image
If you are using our openmetadata/ingestion Docker image, there is just one thing to do: Configure the OpenMetadata server.
The OpenMetadata server takes all its configurations from a YAML file. You can find them in our repo. In openmetadata.yaml, update the pipelineServiceClientConfiguration section accordingly.
If using Docker, make sure that you are passing the correct environment variables:
If using Kubernetes, make sure that you are passing the correct values to Helm Chart:
Custom Airflow Installation
- Note that the
openmetadata-ingestiononly supports Python versions 3.9, 3,10, and 3.11. - The supported Airflow versions for OpenMetadata include 2.3, 2.4, 2.5, 2.6, and 2.7. Starting from release 1.6, OpenMetadata supports compatibility with Airflow versions up to 2.10.5. Specifically, OpenMetadata 1.5 supports Airflow 2.9, 1.6.4 supports Airflow 2.9.3, and 1.6.5 supports Airflow 2.10.5. Ensure that your Airflow version aligns with your OpenMetadata deployment for optimal performance.
You will need to follow three steps:
- Install the
openmetadata-ingestionpackage with the connector plugins that you need. - Install the
openmetadata-managed-apisto deploy our custom APIs on top of Airflow. - Configure the Airflow environment.
- Configure the OpenMetadata server.
1. Install the Connector Modules
The current approach we are following here is preparing the metadata ingestion DAGs as PythonOperators. This means that the packages need to be present in the Airflow instances.
You will need to install:
And then run the DAG as explained in each Connector, where x.y.z is the same version of your OpenMetadata server. For example, if you are on version 1.0.0, then you can install the openmetadata-ingestion with versions 1.0.0.*, e.g., 1.0.0.0, 1.0.0.1, etc., but not 1.0.1.x.
You can also install openmetadata-ingestion[all]==x.y.z, which will bring the requirements to run any connector.
You can check the Connector Modules guide above to learn how to install the openmetadata-ingestion package with the necessary plugins. They are necessary because even if we install the APIs, the Airflow instance needs to have the required libraries to connect to each source.
2. Install the Airflow APIs
The openmetadata-ingestion-apis has a dependency on apache-airflow>=2.2.2. Please make sure that your host satisfies such requirement. Only installing the openmetadata-ingestion-apis won't result in a proper full Airflow installation. For that, please follow the Airflow docs.
The goal of this module is to add some HTTP endpoints that the UI calls for deploying the Airflow DAGs. The first step can be achieved by running:
Here, the same versioning logic applies: x.y.z is the same version of your OpenMetadata server. For example, if you are on version 1.0.0, then you can install the openmetadata-managed-apis with versions 1.0.0.*, e.g., 1.0.0.0, 1.0.0.1, etc., but not 1.0.1.x.
3. Configure the Airflow environment
The ingestion image is built on Airflow's base image, ensuring it includes all necessary requirements to run Airflow. For Kubernetes deployments, the setup uses community Airflow charts with a modified base image, enabling it to function seamlessly as a scheduler, webserver, and worker.
We need a couple of settings:
AIRFLOW_HOME
The APIs will look for the AIRFLOW_HOME environment variable to place the dynamically generated DAGs. Make sure that the variable is set and reachable from Airflow.
Airflow APIs Basic Auth
Note that the integration of OpenMetadata with Airflow requires Basic Auth in the APIs. Make sure that your Airflow configuration supports that. You can read more about it here.
A possible approach here is to update your airflow.cfg entries with:
DAG Generated Configs
Every time a DAG is created from OpenMetadata, it will also create a JSON file with some information about the workflow that needs to be executed. By default, these files live under ${AIRFLOW_HOME}/dag_generated_configs, which in most environments translates to /opt/airflow/dag_generated_configs.
You can change this directory by specifying the environment variable AIRFLOW__OPENMETADATA_AIRFLOW_APIS__DAG_GENERATED_CONFIGS or updating the airflow.cfg with:
A safe way to validate if the configuration is properly set in Airflow is to run:
4. Configure in the OpenMetadata Server
After installing the Airflow APIs, you will need to update your OpenMetadata Server.
The OpenMetadata server takes all its configurations from a YAML file. You can find them in our repo. In openmetadata.yaml, update the pipelineServiceClientConfiguration section accordingly.
If using Docker, make sure that you are passing the correct environment variables:
If using Kubernetes, make sure that you are passing the correct values to Helm Chart:
Validating the installation
What we need to verify here is that the OpenMetadata server can reach the Airflow APIs endpoints (wherever they live: bare metal, containers, k8s pods...). One way to ensure that is to connect to the deployment hosting your OpenMetadata server and running a query against the /health endpoint. For example:
It is important to do this validation passing the command as is (i.e., curl -XGET ${PIPELINE_SERVICE_CLIENT_ENDPOINT}/api/v1/openmetadata/health) and allowing the environment to do the substitution for you. That's the only way we can be sure that the setup is correct.
More validations in the installation
If you have an existing DAG in Airflow, you can further test your setup by running the following:
Note that in this example we are assuming:
- There is an Airflow instance running at
localhost:8080, - There is a user
adminwith passwordadmin - There is a DAG named
example_bash_operator.
A generic call would look like:
Please update it accordingly.
Git Sync?
One recurrent question when setting up Airflow is the possibility of using git-sync to manage the ingestion DAGs.
Let's remark the differences between git-sync and what we want to achieve by installing our custom API plugins:
git-syncwill use Git as the source of truth for your DAGs. Meaning, any DAG you have on Git will eventually be used and scheduled in Airflow.- With the
openmetadata-managed-apiswe are using the OpenMetadata server as the source of truth. We are enabling dynamic DAG creation from the OpenMetadata into your Airflow instance every time that you create a new Ingestion Workflow.
Then, should you use git-sync?
- If you have an existing Airflow instance, and you want to build and maintain your own ingestion DAGs then you can go for it. Check a DAG example here.
- If instead, you want to use the full deployment process from OpenMetadata,
git-syncwould not be the right tool, since the DAGs won't be backed up by Git, but rather created from OpenMetadata. Note that if anything would to happen where you might lose the Airflow volumes, etc. You can just redeploy the DAGs from OpenMetadata.
SSL
If you want to learn how to set up Airflow using SSL, you can learn more here:
Troubleshooting
Ingestion Pipeline deployment issues
Airflow APIs Not Found
Validate the installation, making sure that from the OpenMetadata server you can reach the Airflow host, and the call to /health gives us the proper response:
Also, make sure that the version of your OpenMetadata server matches the openmetadata-ingestion client version installed in Airflow.
GetServiceException: Could not get service from type XYZ
In this case, the OpenMetadata client running in the Airflow host had issues getting the service you are trying to deploy from the API. Note that once pipelines are deployed, the auth happens via the ingestion-bot. Here there are a couple of points to validate:
- The JWT of the ingestion bot is valid. You can check services such as https://jwt.io/ to help you review if the token is expired or if there are any configuration issues.
- The
ingestion-botdoes not have the proper role. If you go to<openmetadata-server>/bots/ingestion-bot, the bot should present theIngestion bot role. You can validate the role policies as well to make sure they were not updated and the bot can indeed view and access services from the API. - Run an API call for your service to verify the issue. An example trying to get a database service would look like follows:If, for example, you have an issue with the roles you would be getting a message similar to:
AirflowException: Dag 'XYZ' could not be found
If you're seeing a similar error to
This is a common situation where you have not properly enabled the shared volumes between Webserver <> Scheduler <> Worker in your distributed environment.
We have specific instructions on how to set up the shared volumes in Kubernetes depending on your cloud deployment here.
ClientInitializationError
The main root cause here is a version mismatch between the server and the client. Make sure that the openmetadata-ingestion python package you installed on the Airflow host has the same version as the OpenMetadata server. For example, to set up OpenMetadata server 0.13.2 you will need to install openmetadata-ingestion~=0.13.2. Note that we are validating the version as in x.y.z. Any differences after the PATCH versioning are not taken into account, as they are usually small bugfixes on existing functionalities.
401 Unauthorized
If you get this response during a Test Connection or Deploy:
This is a communication issue between the OpenMetadata Server and the Airflow instance. You are able to reach the Airflow host, but your provided user and password are not correct. Note the following section of the server configuration:
You should validate if the content of the environment variables AIRFLOW_USERNAME and AIRFLOW_PASSWORD allow you to authenticate to the instance.
CentOS / Debian - The name 'template_blueprint' is already registered
If you are using a CentOS / Debian system to install the openmetadata-managed-apis you might encounter the following issue when starting Airflow:
The issue occurs because a symlink exists inside the venv
A workaround is to remove the lib64 symlink: rm lib64.