> ## Documentation Index
> Fetch the complete documentation index at: https://docs.open-metadata.org/llms.txt
> Use this file to discover all available pages before exploring further.
# Intake Forms | OpenMetadata Governance Guide
> Require specific fields to be filled in before a Data Product, Domain, or Glossary Term can be created or updated using Intake Forms.
# Intake Forms
Intake Forms let you require specific fields to be filled in before a **Data Product**, **Domain**, or **Glossary Term** can be created or updated. Use them to make sure every new asset of these types has the ownership, classification, or descriptive metadata your organization needs from the start. This way, reviewers don't have to catch gaps after the fact.
Only one Intake Form can exist per entity type. OpenMetadata enforces it at both the API and UI layers, so a required field can't be skipped by using the API directly either.
Fields the entity's own schema already requires, such as name and description, are always enforced. They aren't configurable here. An Intake Form only adds further, organization-specific requirements on top of them.
## Creating an Intake Form
You must have the Admin role to create and manage Intake Forms.
Navigate to **Settings** > **Governance** > **Intake Forms**. Select the tab below for the entity type you want to configure. An entity type that already has a form shows as already configured and can't be selected again.
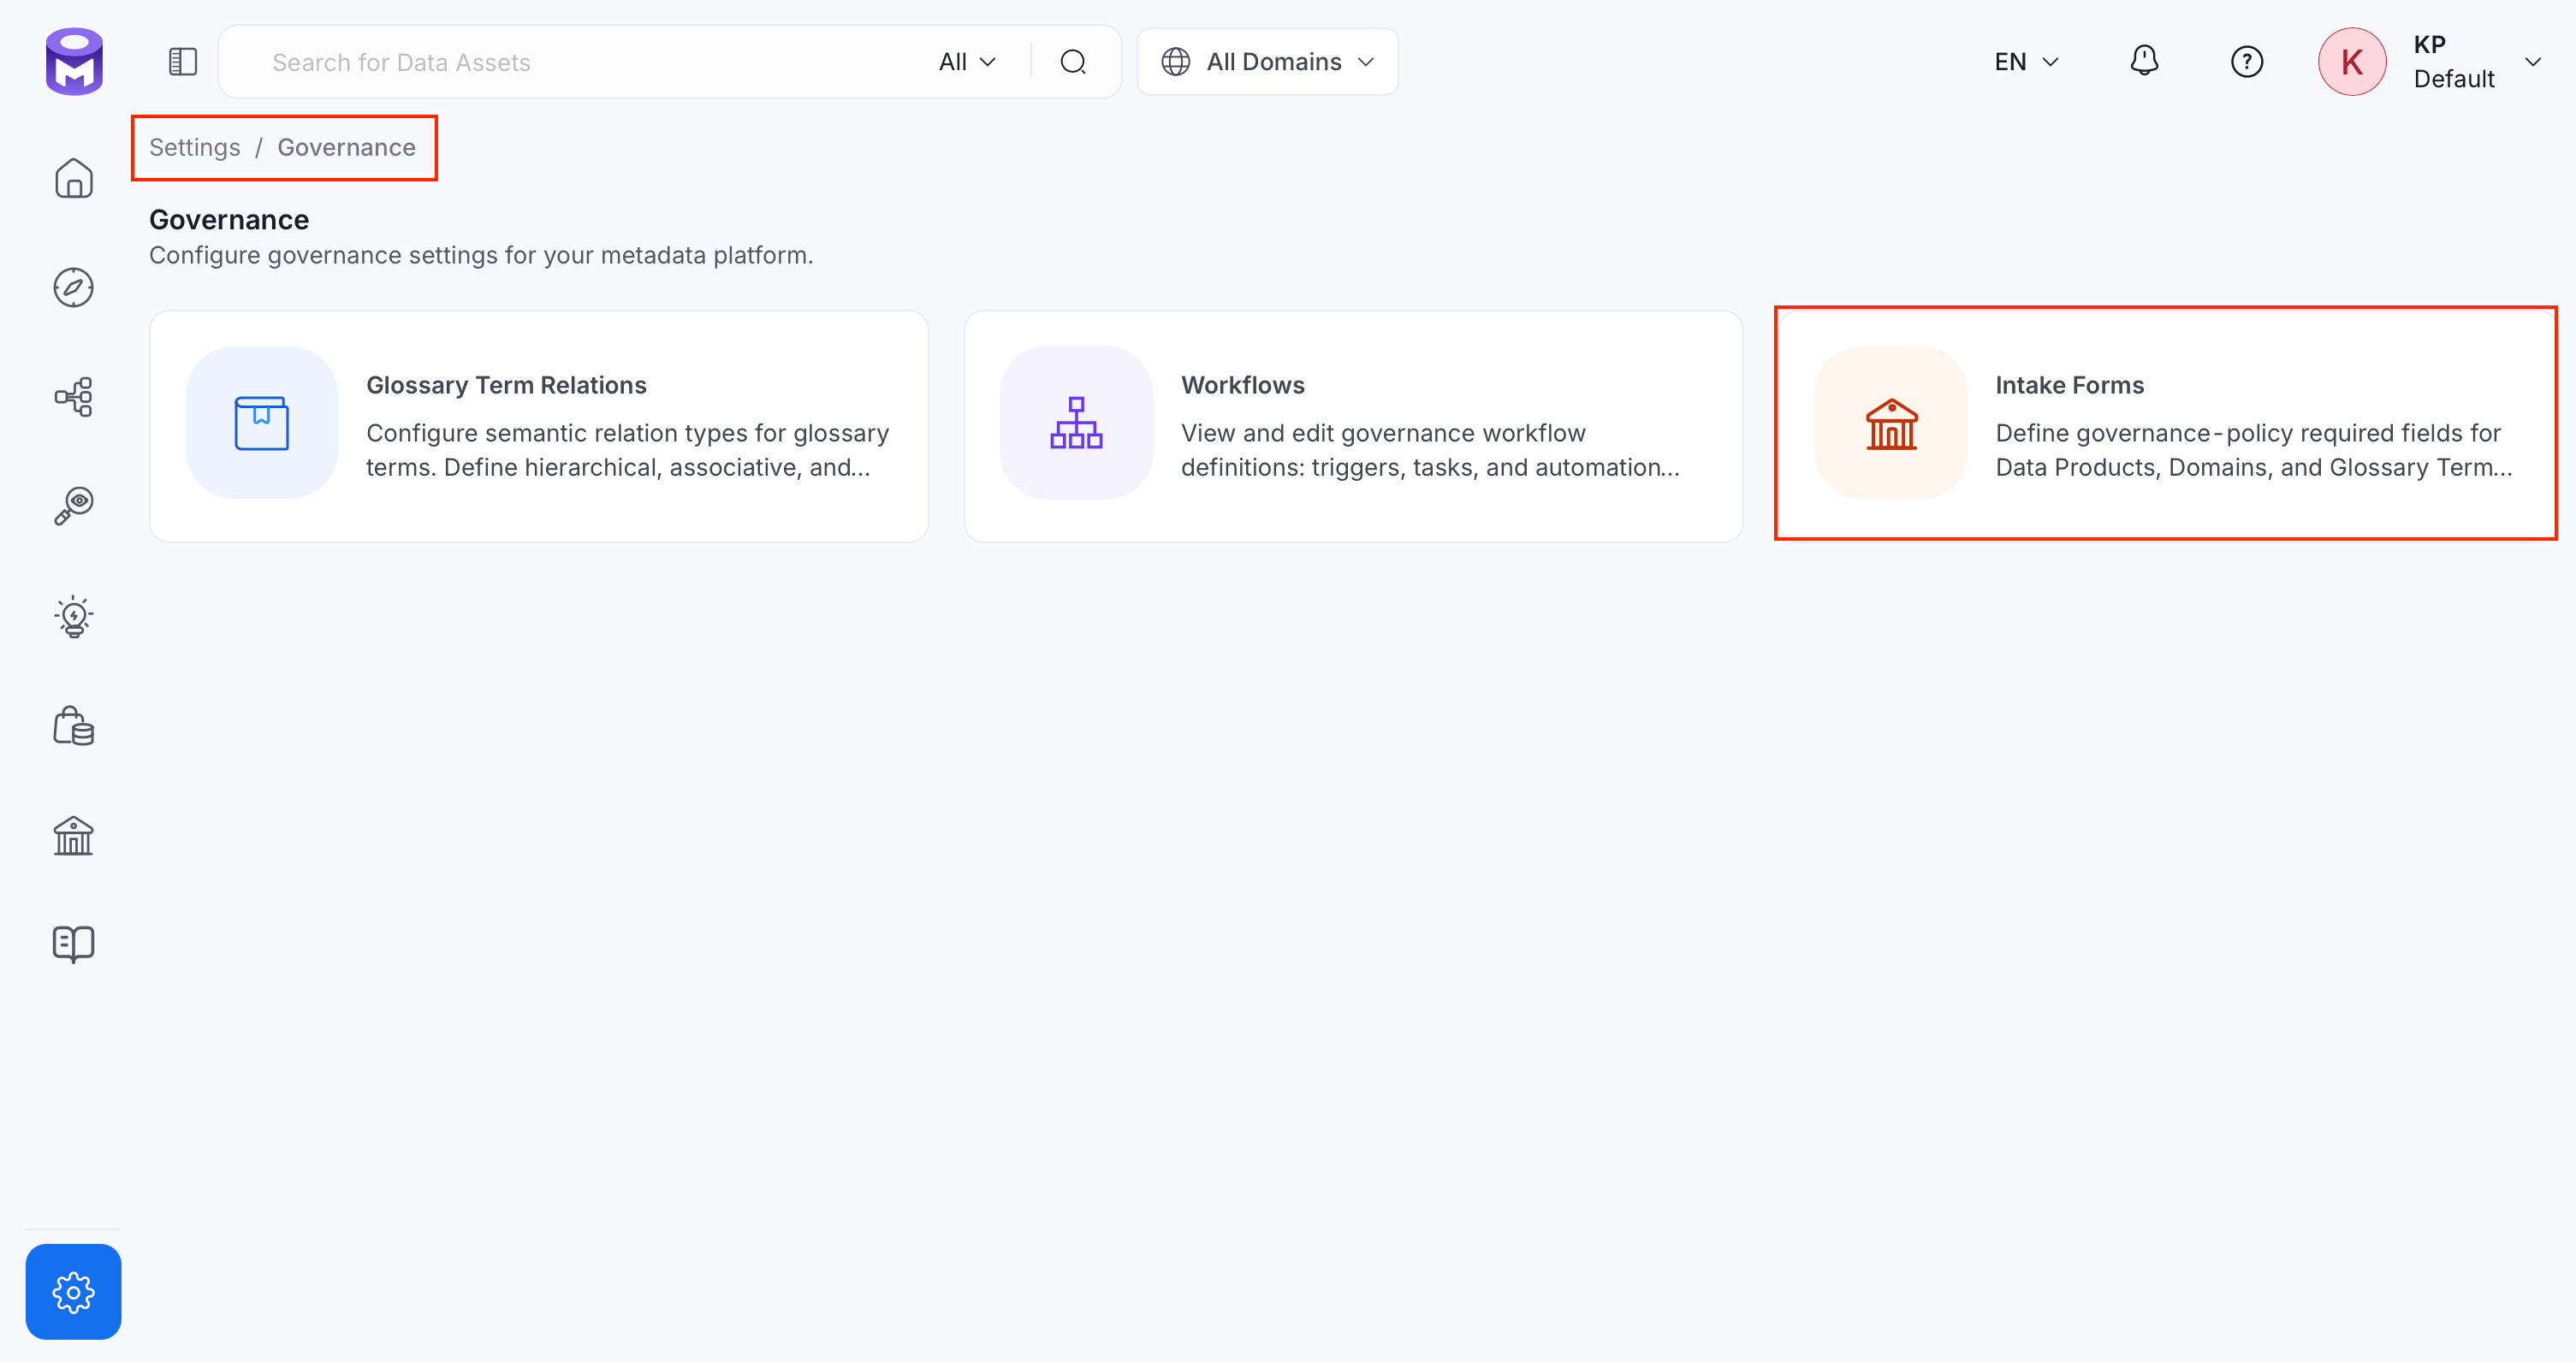 1. Click **Add Intake Form**, then select **Data Product**.
2. Optional: Add a **Description** explaining what this form enforces.
3. Optional: Toggle **Enabled** off to save the form without enforcing it yet. It's on by default.
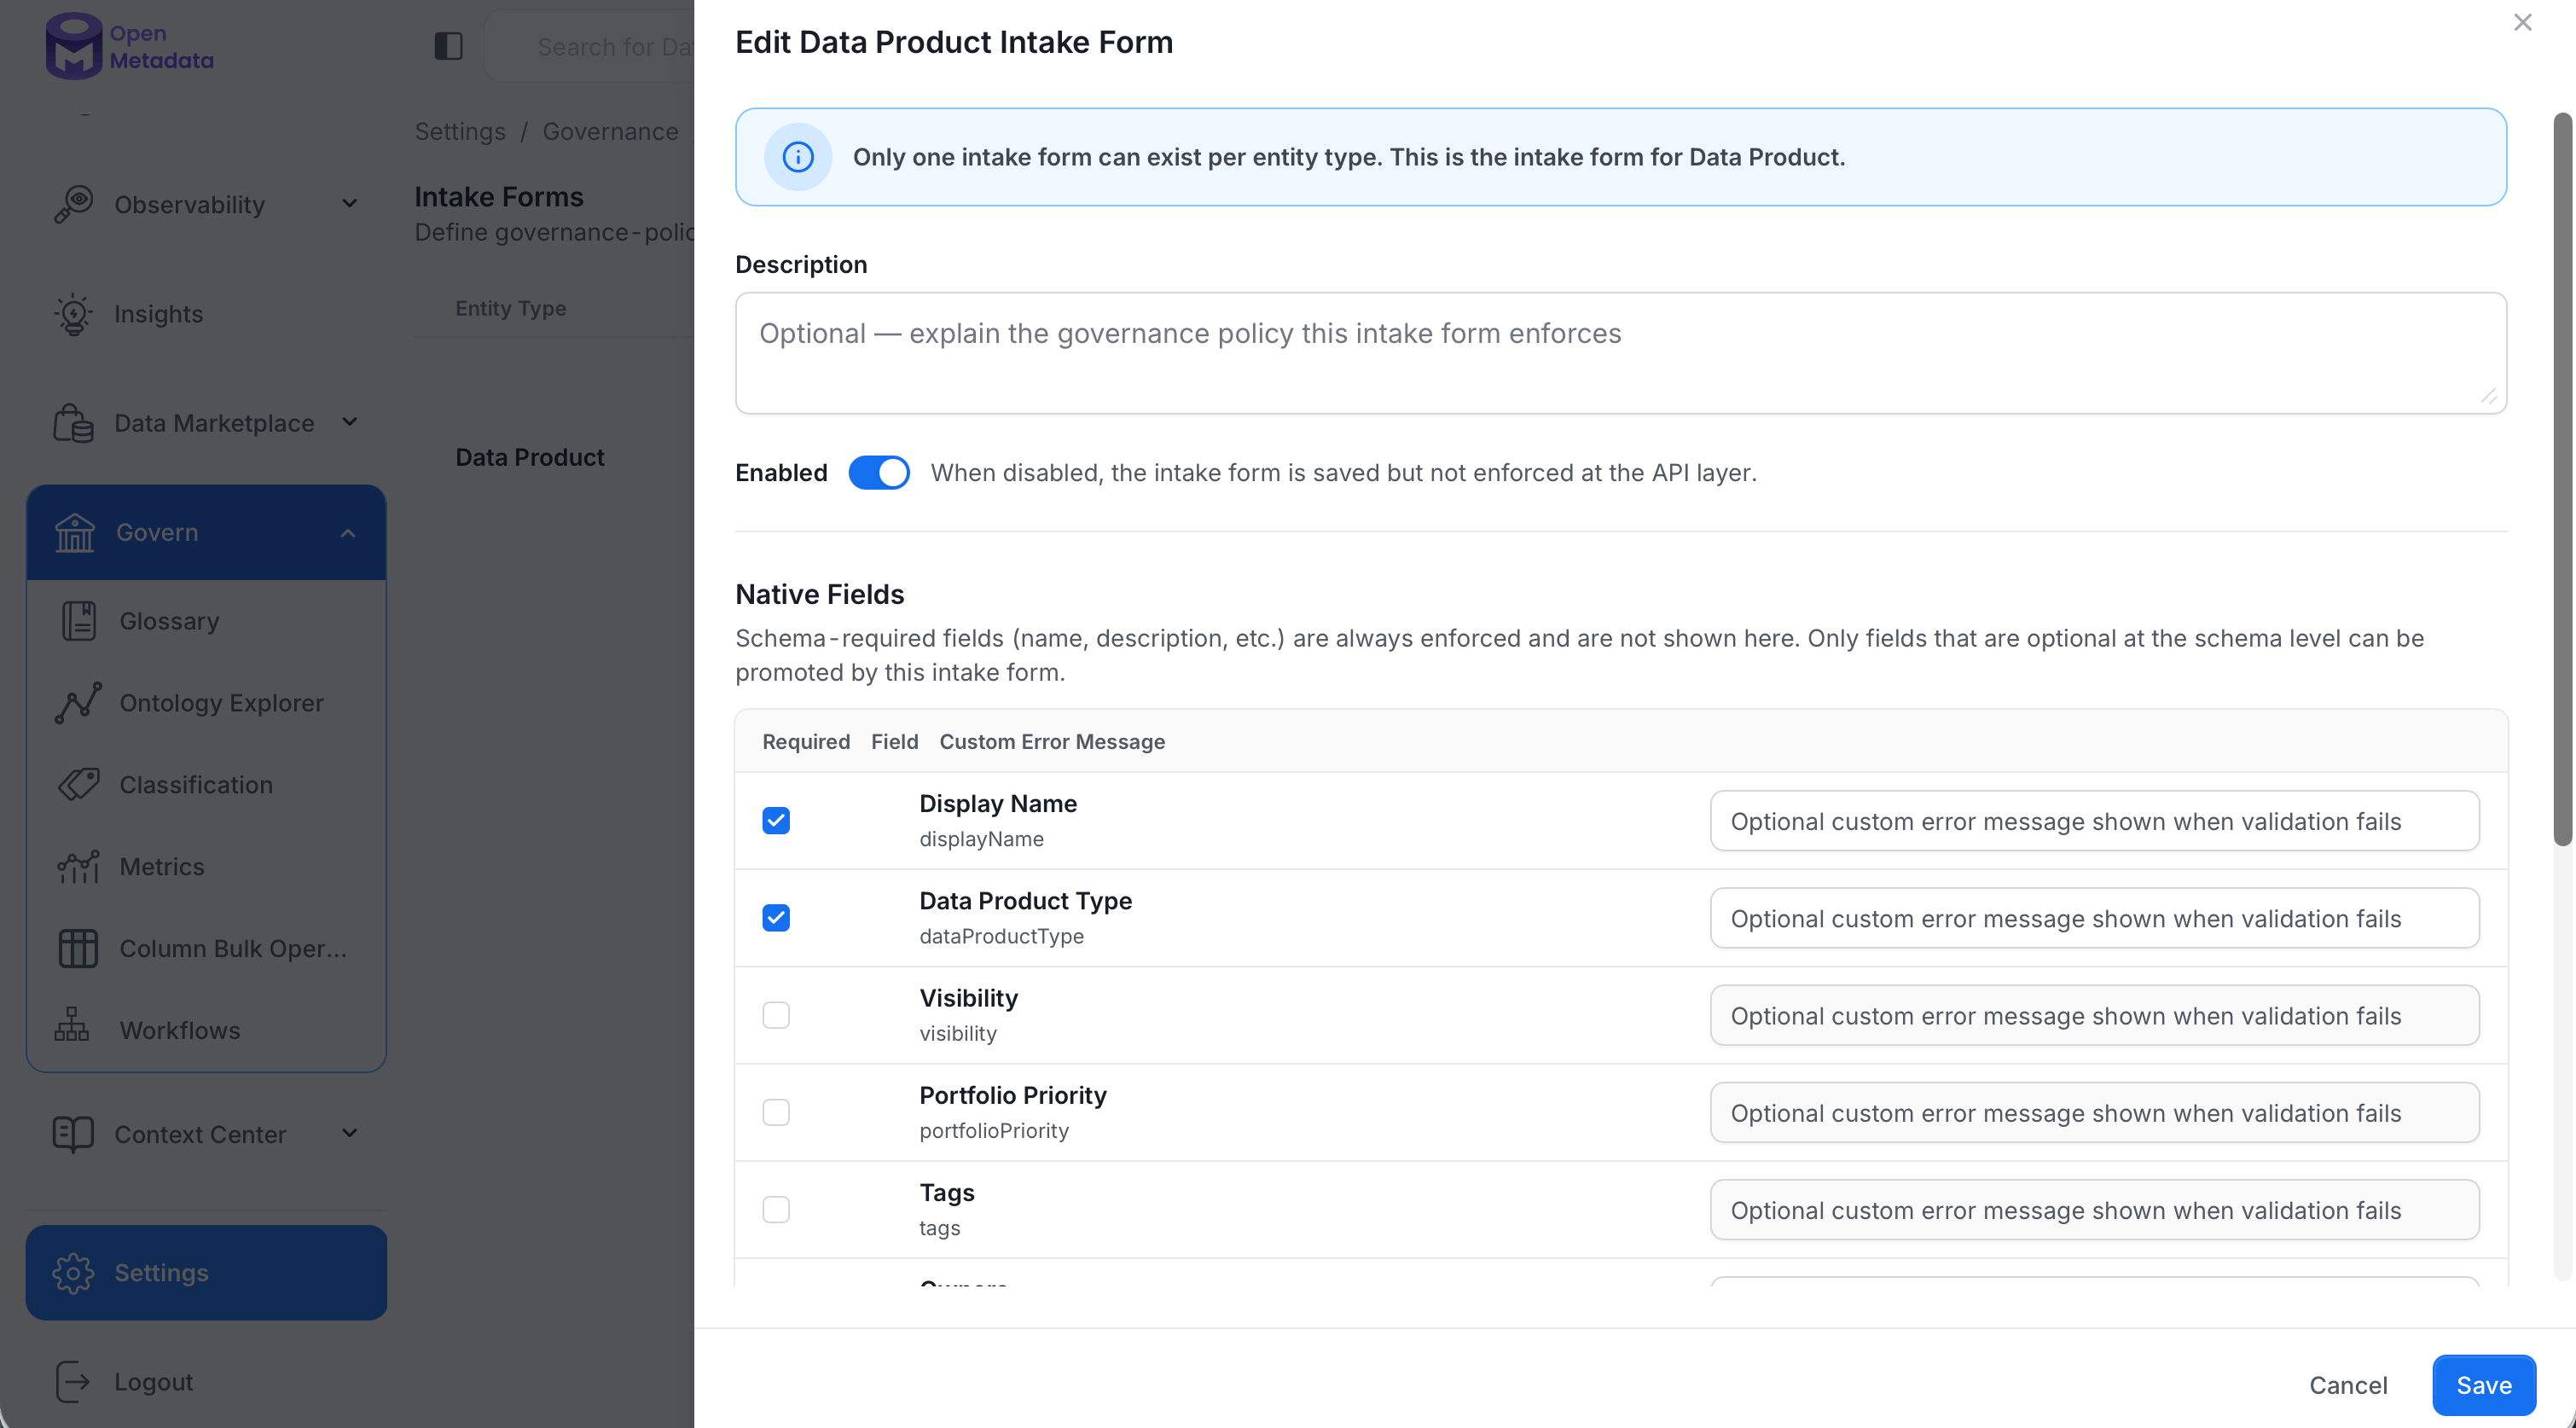
4. Under **Native Fields**, do the following. Only fields that are optional at the schema level are listed here. Schema-required fields such as name and description are always enforced and don't appear.
* Check the **Required** box for any of the following fields you want to enforce.
| Field | Description |
| - | - |
| **Display Name** | Name used for display purposes. |
| **Data Product Type** | The product's type in the Open Data Product Standard (ODPS) taxonomy, such as Dataset or Derived Data. |
| **Visibility** | Who can discover and access the data product: Private, Invitation, Organisation, Dataspace, or Public. |
| **Portfolio Priority** | The product's priority in your data product portfolio: Critical, High, Medium, or Low. |
| **Tags** | Tags associated with the data product. |
| **Owners** | Owners of the data product. |
| **Reviewers** | Users who review the data product. |
| **Experts** | Users who are experts for the data product. |
* Optional: Enter a custom error message for a required field, shown instead of the default message when that field is missing.
5. Under **Custom Properties**, do the following:
* Select **Include** for any custom property defined on Data Product that you want to add to the form.
* Check the **Required** box for any included property that must be filled in.
* Optional: Enter a custom error message for a required field, shown instead of the default message when that field is missing.
6. Click **Create**.
The following image shows the saved form in edit mode.
1. Click **Add Intake Form**, then select **Data Product**.
2. Optional: Add a **Description** explaining what this form enforces.
3. Optional: Toggle **Enabled** off to save the form without enforcing it yet. It's on by default.
4. Under **Native Fields**, do the following. Only fields that are optional at the schema level are listed here. Schema-required fields such as name and description are always enforced and don't appear.
* Check the **Required** box for any of the following fields you want to enforce.
| Field | Description |
| - | - |
| **Display Name** | Name used for display purposes. |
| **Data Product Type** | The product's type in the Open Data Product Standard (ODPS) taxonomy, such as Dataset or Derived Data. |
| **Visibility** | Who can discover and access the data product: Private, Invitation, Organisation, Dataspace, or Public. |
| **Portfolio Priority** | The product's priority in your data product portfolio: Critical, High, Medium, or Low. |
| **Tags** | Tags associated with the data product. |
| **Owners** | Owners of the data product. |
| **Reviewers** | Users who review the data product. |
| **Experts** | Users who are experts for the data product. |
* Optional: Enter a custom error message for a required field, shown instead of the default message when that field is missing.
5. Under **Custom Properties**, do the following:
* Select **Include** for any custom property defined on Data Product that you want to add to the form.
* Check the **Required** box for any included property that must be filled in.
* Optional: Enter a custom error message for a required field, shown instead of the default message when that field is missing.
6. Click **Create**.
The following image shows the saved form in edit mode.
 1. Click **Add Intake Form**, then select **Domain**.
2. Optional: Add a **Description** explaining what this form enforces.
3. Optional: Toggle **Enabled** off to save the form without enforcing it yet. It's on by default.
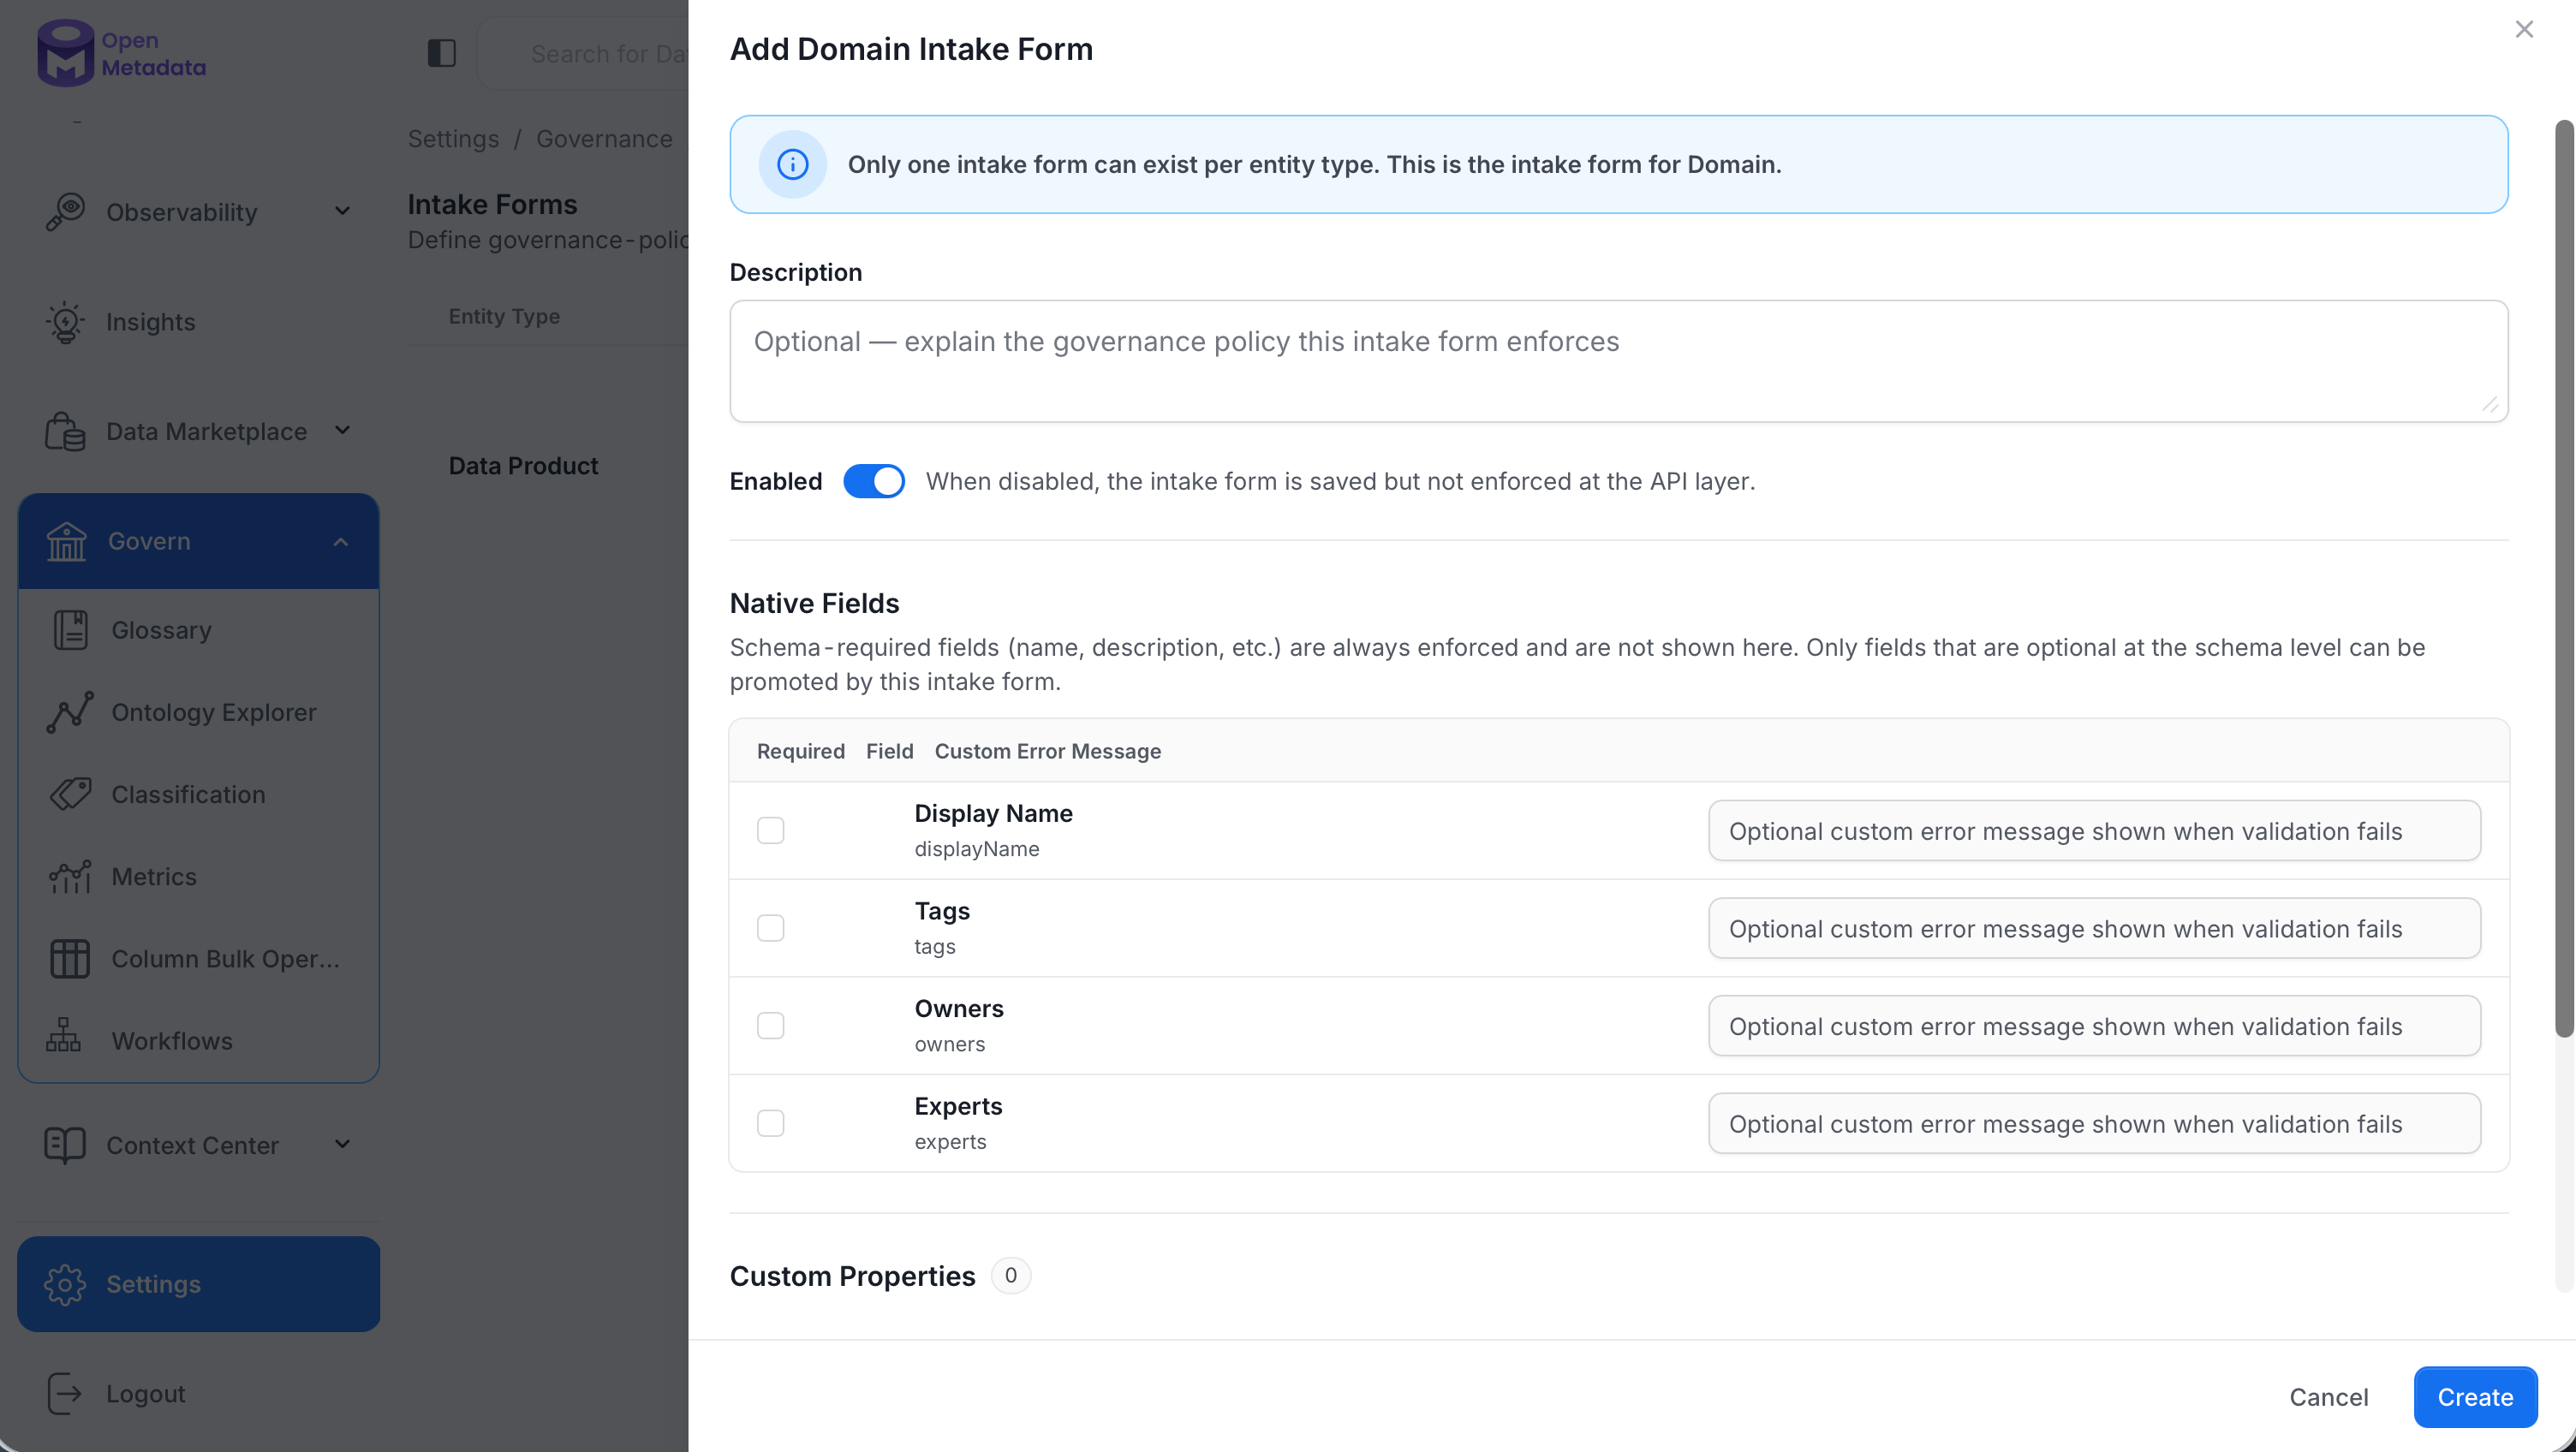
4. Under **Native Fields**, do the following. Only fields that are optional at the schema level are listed here. Schema-required fields such as name and description are always enforced and don't appear.
* Check the **Required** box for any of the following fields you want to enforce.
| Field | Description |
| - | - |
| **Display Name** | Name used for display purposes. |
| **Tags** | Tags associated with the domain. |
| **Owners** | Owners of the domain. |
| **Experts** | Users who are experts in the domain. |
* Optional: Enter a custom error message for a required field, shown instead of the default message when that field is missing.
5. Under **Custom Properties**, do the following:
* Select **Include** for any custom property defined on Domain that you want to add to the form.
* Check the **Required** box for any included property that must be filled in.
* Optional: Enter a custom error message for a required field, shown instead of the default message when that field is missing.
6. Click **Create**.
The following image shows the saved form in edit mode.
1. Click **Add Intake Form**, then select **Domain**.
2. Optional: Add a **Description** explaining what this form enforces.
3. Optional: Toggle **Enabled** off to save the form without enforcing it yet. It's on by default.
4. Under **Native Fields**, do the following. Only fields that are optional at the schema level are listed here. Schema-required fields such as name and description are always enforced and don't appear.
* Check the **Required** box for any of the following fields you want to enforce.
| Field | Description |
| - | - |
| **Display Name** | Name used for display purposes. |
| **Tags** | Tags associated with the domain. |
| **Owners** | Owners of the domain. |
| **Experts** | Users who are experts in the domain. |
* Optional: Enter a custom error message for a required field, shown instead of the default message when that field is missing.
5. Under **Custom Properties**, do the following:
* Select **Include** for any custom property defined on Domain that you want to add to the form.
* Check the **Required** box for any included property that must be filled in.
* Optional: Enter a custom error message for a required field, shown instead of the default message when that field is missing.
6. Click **Create**.
The following image shows the saved form in edit mode.
 1. Click **Add Intake Form**, then select **Glossary Term**.
2. Optional: Add a **Description** explaining what this form enforces.
3. Optional: Toggle **Enabled** off to save the form without enforcing it yet. It's on by default.
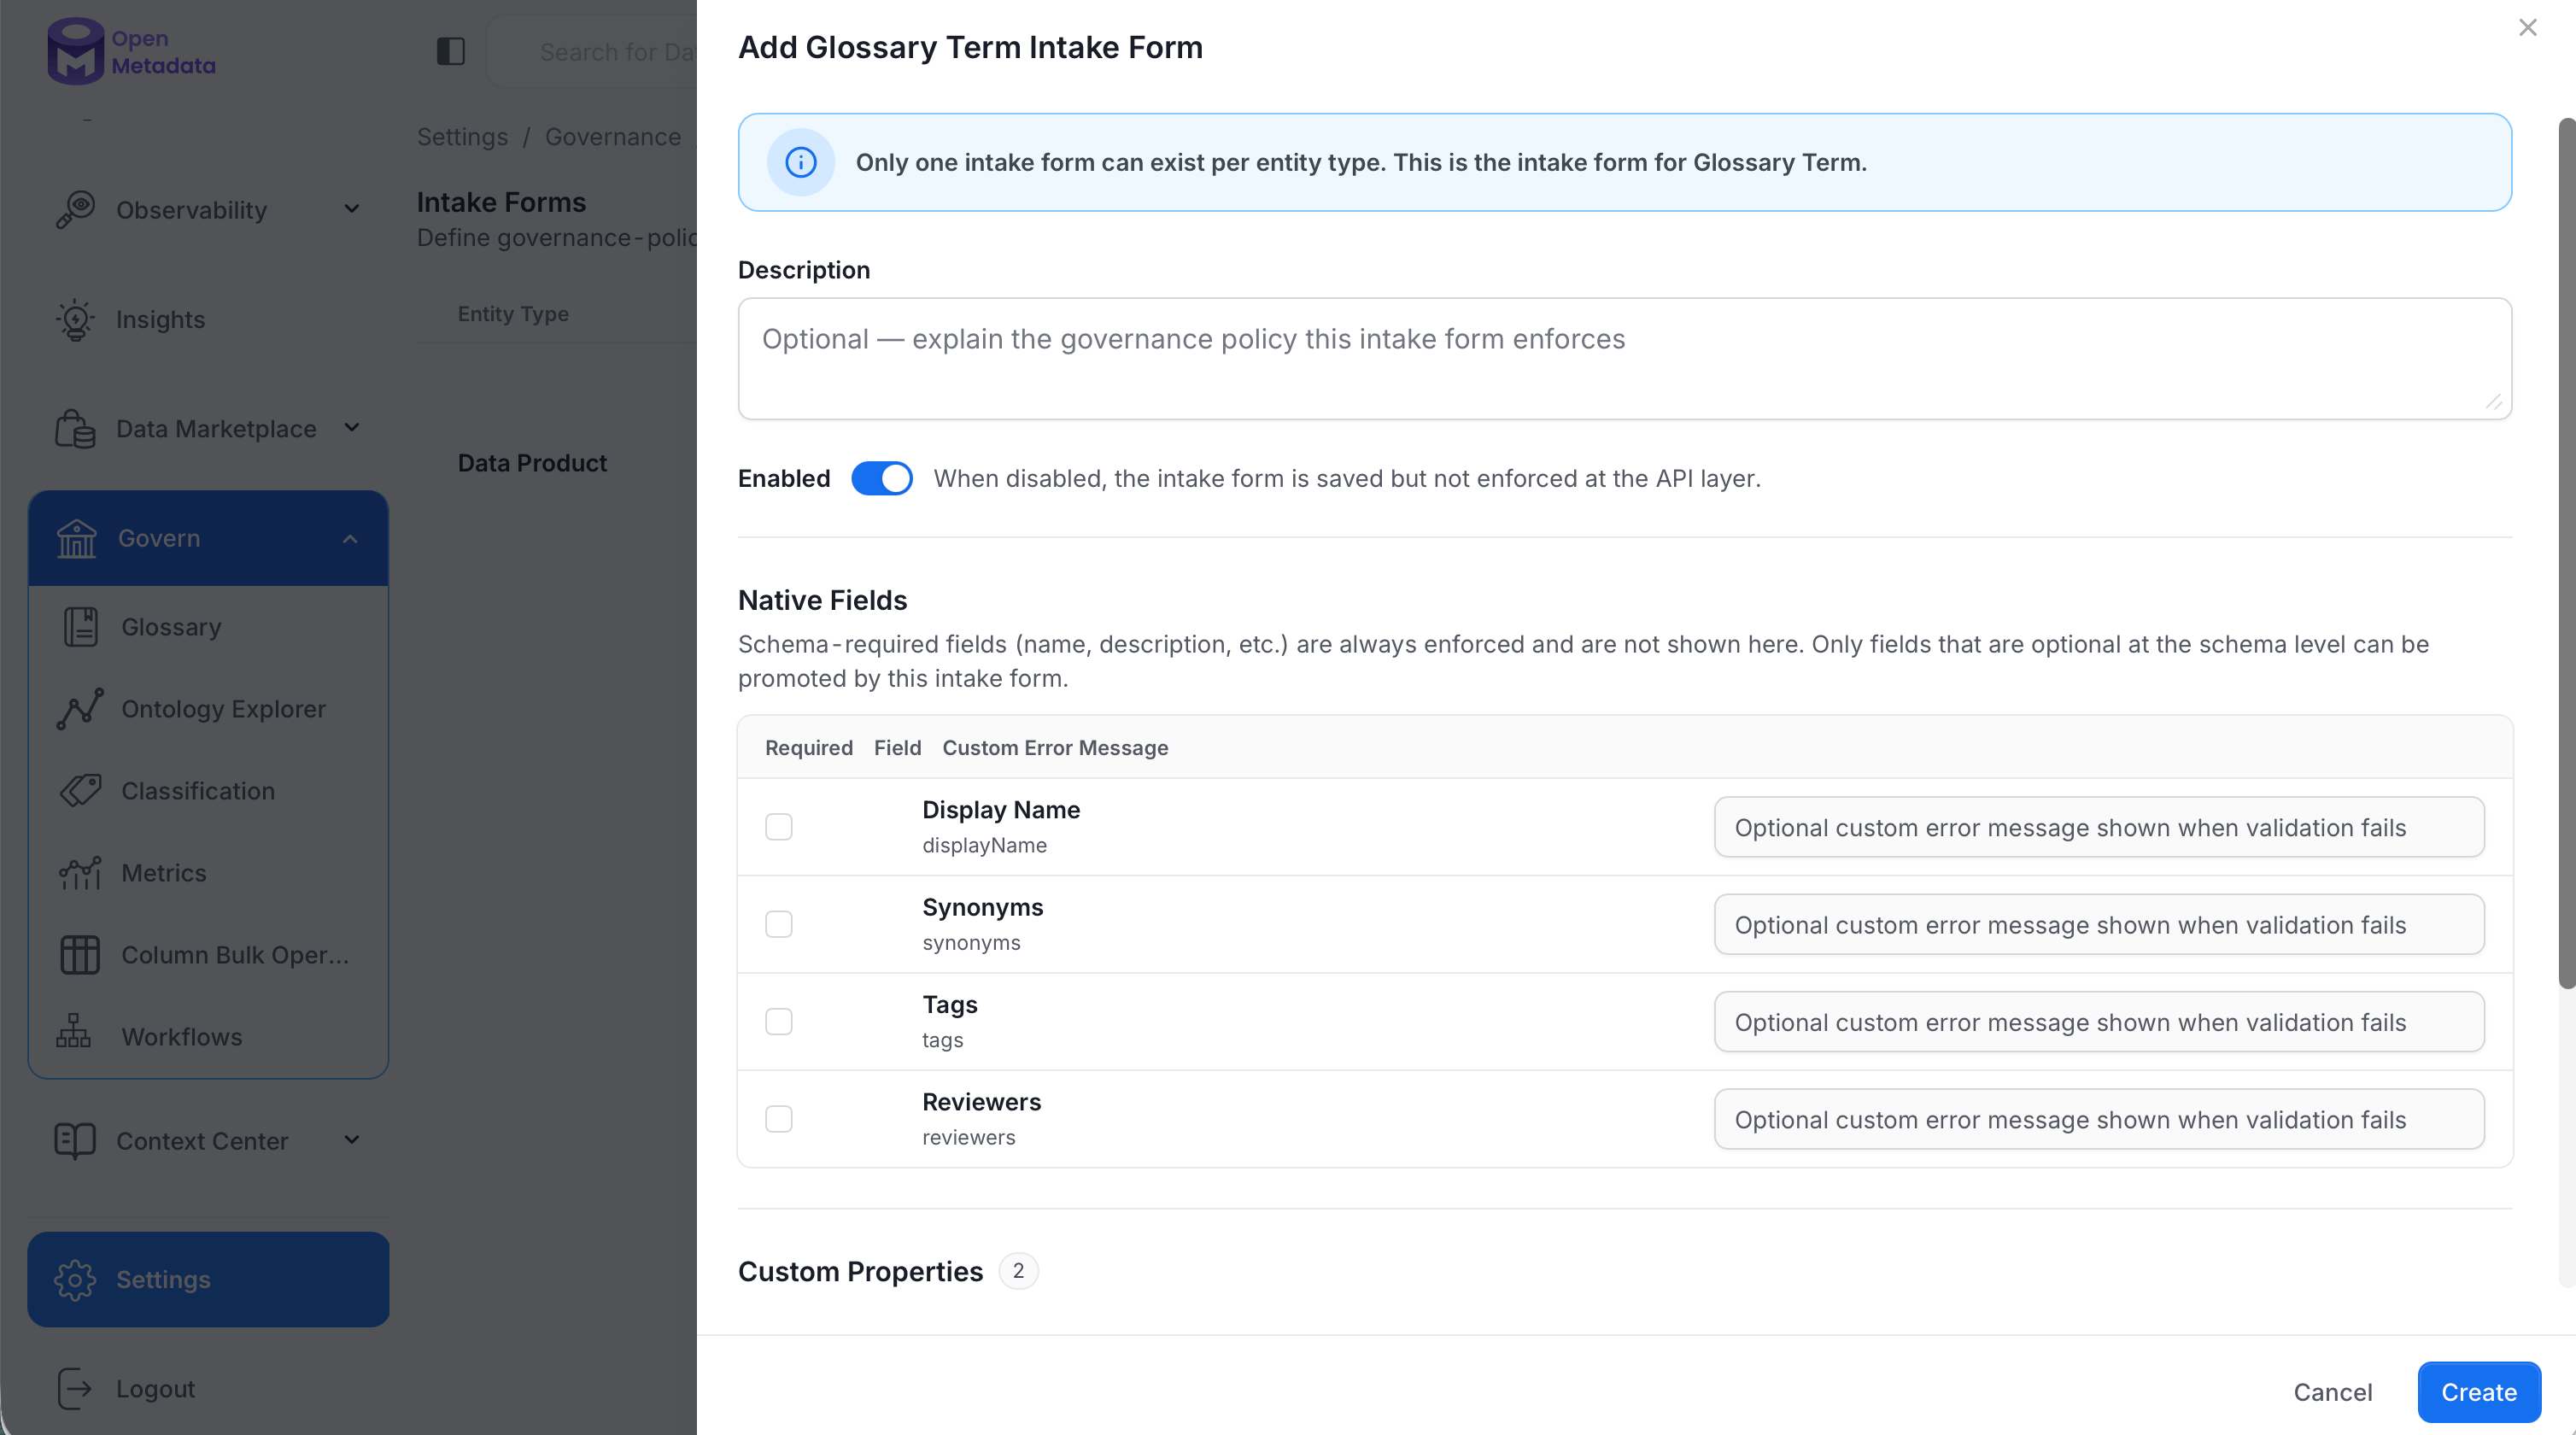
4. Under **Native Fields**, do the following. Only fields that are optional at the schema level are listed here. Schema-required fields such as name and description are always enforced and don't appear.
* Check the **Required** box for any of the following fields you want to enforce.
| Field | Description |
| - | - |
| **Display Name** | Display name of the glossary term. |
| **Synonyms** | Alternate names that are synonyms or near-synonyms for the term. |
| **Tags** | Tags associated with the term. |
| **Reviewers** | Users who review the term. |
* Optional: Enter a custom error message for a required field, shown instead of the default message when that field is missing.
5. Under **Custom Properties**, do the following:
* Select **Include** for any custom property defined on Glossary Term that you want to add to the form.
* Check the **Required** box for any included property that must be filled in.
* Optional: Enter a custom error message for a required field, shown instead of the default message when that field is missing.
6. Click **Create**.
The following image shows the saved form in edit mode.
1. Click **Add Intake Form**, then select **Glossary Term**.
2. Optional: Add a **Description** explaining what this form enforces.
3. Optional: Toggle **Enabled** off to save the form without enforcing it yet. It's on by default.
4. Under **Native Fields**, do the following. Only fields that are optional at the schema level are listed here. Schema-required fields such as name and description are always enforced and don't appear.
* Check the **Required** box for any of the following fields you want to enforce.
| Field | Description |
| - | - |
| **Display Name** | Display name of the glossary term. |
| **Synonyms** | Alternate names that are synonyms or near-synonyms for the term. |
| **Tags** | Tags associated with the term. |
| **Reviewers** | Users who review the term. |
* Optional: Enter a custom error message for a required field, shown instead of the default message when that field is missing.
5. Under **Custom Properties**, do the following:
* Select **Include** for any custom property defined on Glossary Term that you want to add to the form.
* Check the **Required** box for any included property that must be filled in.
* Optional: Enter a custom error message for a required field, shown instead of the default message when that field is missing.
6. Click **Create**.
The following image shows the saved form in edit mode.
 ## Managing Intake Forms
After you add the Intake Form, it appears in the Intake Forms list. From there, do any of the following:
## Managing Intake Forms
After you add the Intake Form, it appears in the Intake Forms list. From there, do any of the following:
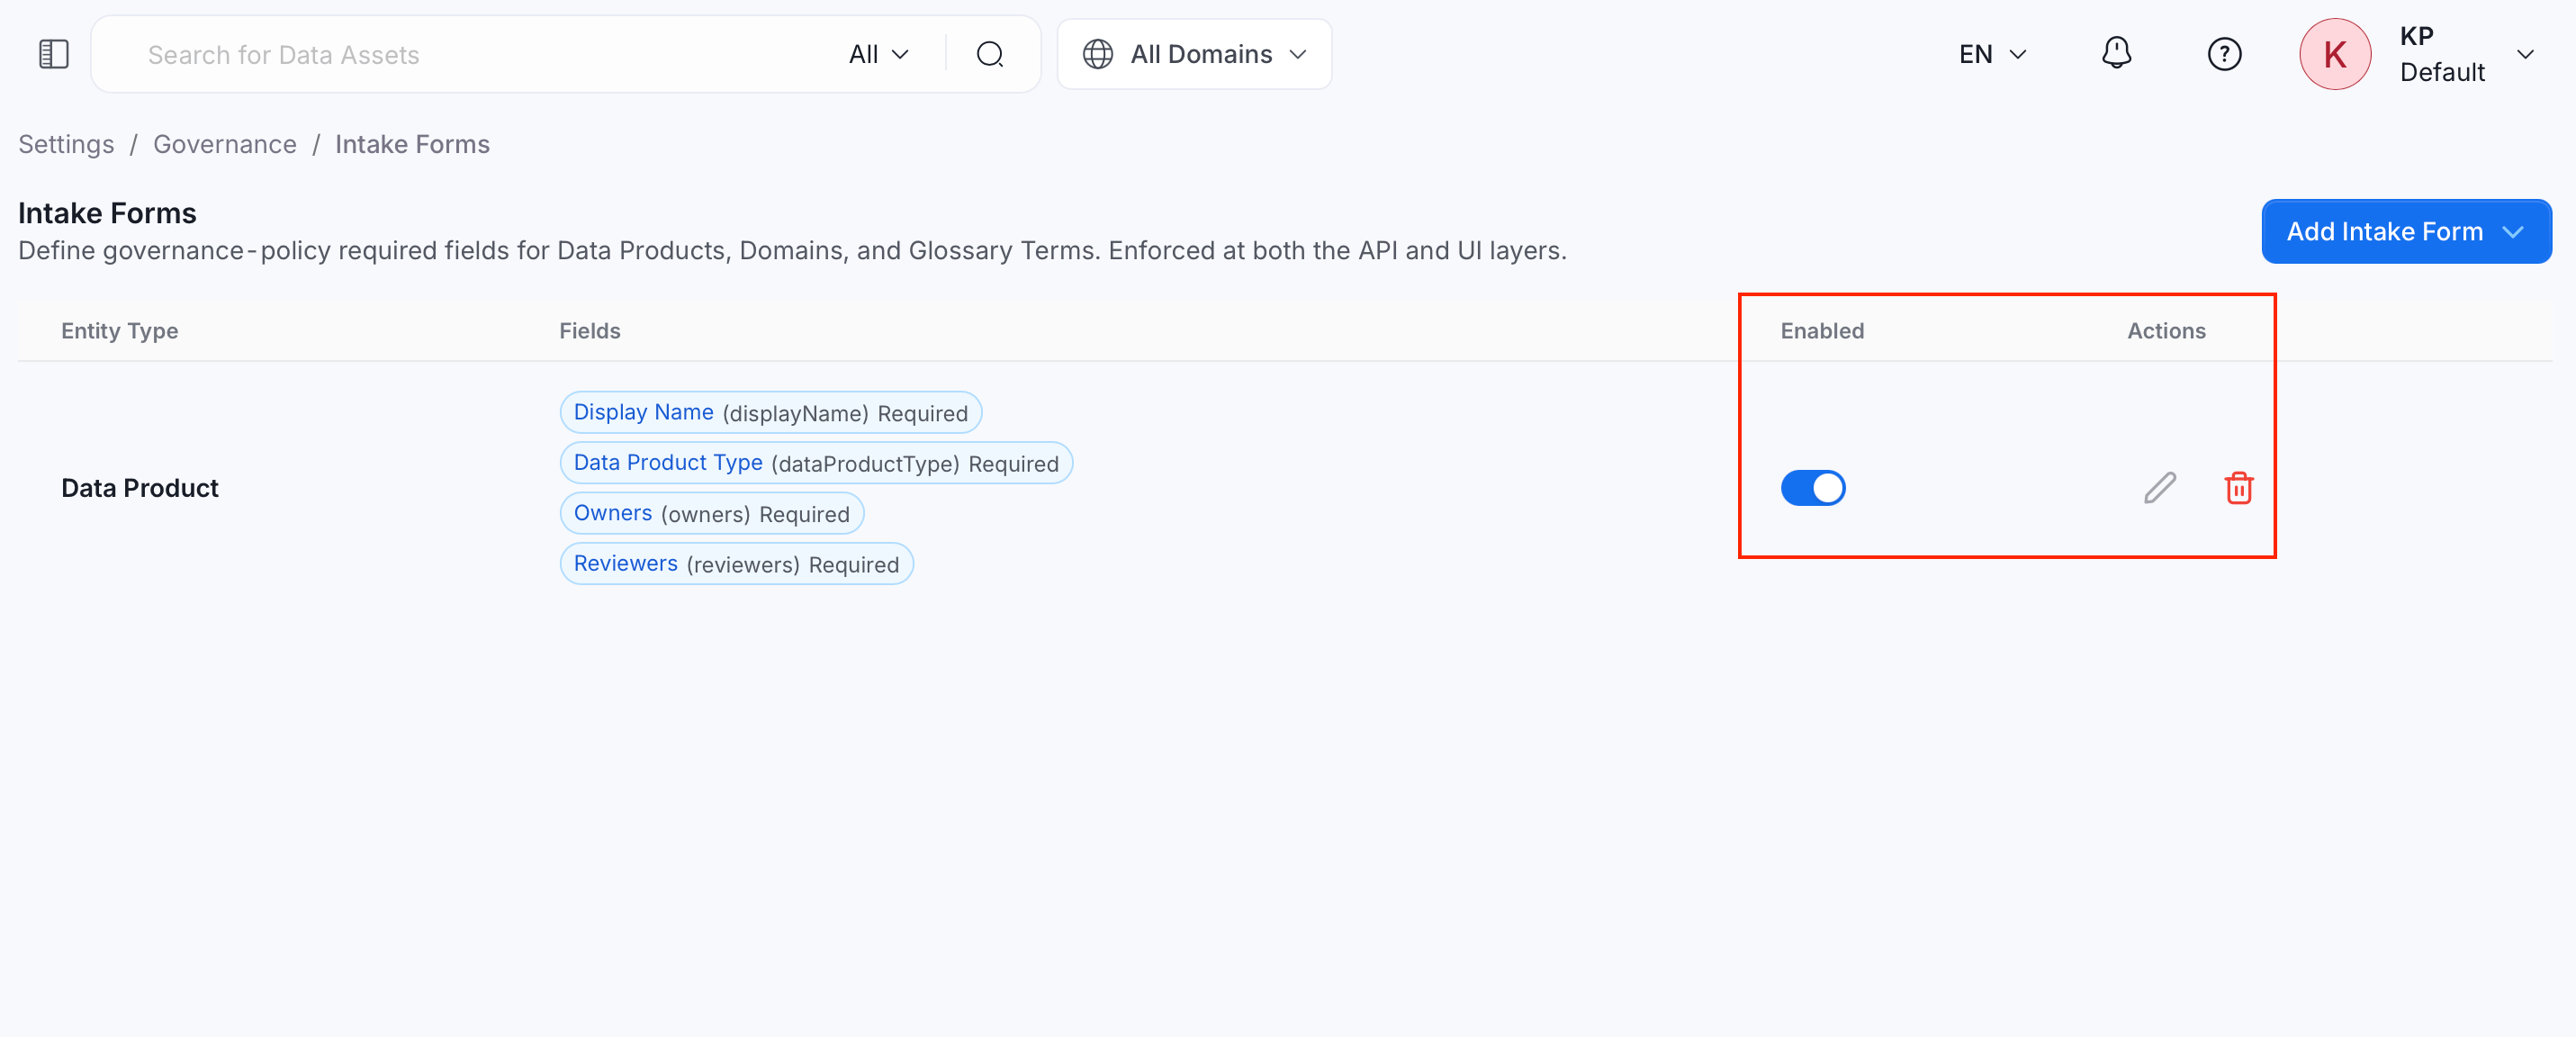 * **Enabled** toggle: Use this to turn the form's enforcement on or off without deleting it. A disabled form doesn't block anything.
* **Actions**: In the Actions column, do any of the following:
* **Edit**: Click the **Edit** icon, modify the details, and click **Save**.
* **Delete**: Click the **Delete** icon, then confirm the deletion in the dialog.
## What Happens When a Required Field Is Missing
If a required field's value is missing when someone creates or updates a matching entity, OpenMetadata rejects the request and lists which fields are missing. It shows your custom error message instead, if you set one for that field.
This documentation is built and hosted on [Mintlify](https://mintlify.com), a developer documentation platform.
* **Enabled** toggle: Use this to turn the form's enforcement on or off without deleting it. A disabled form doesn't block anything.
* **Actions**: In the Actions column, do any of the following:
* **Edit**: Click the **Edit** icon, modify the details, and click **Save**.
* **Delete**: Click the **Delete** icon, then confirm the deletion in the dialog.
## What Happens When a Required Field Is Missing
If a required field's value is missing when someone creates or updates a matching entity, OpenMetadata rejects the request and lists which fields are missing. It shows your custom error message instead, if you set one for that field.
This documentation is built and hosted on [Mintlify](https://mintlify.com), a developer documentation platform.